How Do I Setup the Default Status Settings?
The Default Status Settings are various settings which are necessary for a smooth Workflow of the software. Various options have been provided on this screen which can used to resolve issues commonly occurring in a RIS/ PACS system. The option is available through Workflow > Default Status Settings > Setup.

Choosing the Setup option will open the Default Status Setup form.

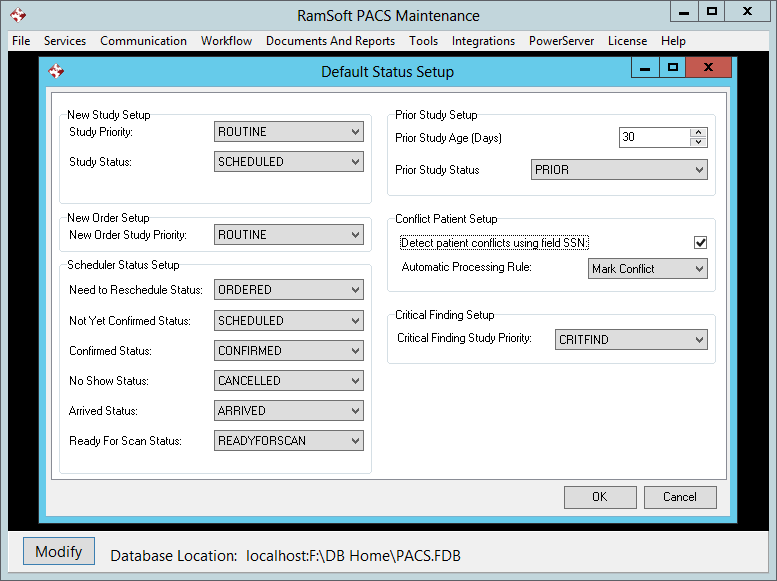
There are five separate sections on the form e.g. New Study Setup, Scheduler Status Setup, Prior Study Setup, Conflict Patient Setup and Critical Finding Setup.
The New Study Setup section
The New Study Setup section is used to configure the Priority and Study Status of a newly created study in the Study Info form.

The New Study Setup section has two fields. The first field is the Study Priority field (the priority of the newly created study) and Study Status field (the status of the newly created study).
The New Order Setup section
The New Order Setup section is used to configure the Priority of a new order in the New Order form.
![]()
A priority in this drop-down menu is displayed as the default priority in the New Order form of PowerReader. The default value is MEDIUM (20).
The Scheduler Status Setup section
The Scheduler Status Setup section allows a user to automatically mark a patient's status by choosing a certain option when they have an appointment in the Scheduler.

In this section, the user has an option to choose a variety of statuses for each action. The Need to Reschedule Status, Not Yet Confirmed Status, Confirmed Status, No Show Status, Arrived Status and Ready for Scan Status each require a specific status to be selected respectively. These options are shown in the scheduler when a user right-clicks on a particular appointment. When the user chooses any of these options in the scheduler, the status of the appointment is changed according to the statuses defined in this section.
By default, the following statuses have been defined:
- Need to Reschedule Status: Sets the study's status to ORDERED
- Not yet Confirmed Status: Sets the study's status to SCHEDULED
- Confirmed Status: Sets the study's status to CONFIRMED
- No Show Status: Sets the study's status to CANCELLED and removes the study from the scheduler
- Arrived Status: Sets the study's status to ARRIVED
- Ready for Scan Status: Sets the study's status to STARTED
For example, in the event of a patient deciding to reschedule their appointment, the user will right click on the patient name in the scheduler and choose the Need to Reschedule option. This will automatically reset the patient's status to the one set up in this form (in this case ORDERED status).
The Prior Study Setup section
The Prior Study Setup section allows the system to automatically detect prior studies based on their study age. By default, this option is configured at 30 days. Thus if a study older than 30 days is received/ imported, the status of the study is automatically set as Prior. The option keeps the above mentioned study from entering the Technologist's or Radiologist's worklist.

The Prior Study Age (days) field is used to determine which studies older than the time period specified, will be considered as Priors. The number of days are counted from the Study Date. Any study with a study date older than X days (default 180) is considered a prior. The users have the option to change the number of days according to their preference.
The Prior Study Status drop down menu contains all the Study Statuses. This is the status assigned to any study which is deemed prior by the system. The status assigned by default is PRIOR although the users have the option to change the status according to their preference.
It is recommended that all services must be restarted to allow these settings to take effect.
The Conflict Patient Setup section
When creating a new patient, often times information entered is identical to a previously registered patient within the system. In this case, the user entering the data is notified that the patient already exists. However, often times a study is received from another station where the patient has the same Last Name, Patient ID and Issuer of Patient Identity as that of an existing patient in the system. In certain situations a new patient arrives with a Social Security Number/ Health Card Number identical to that of another patient already in the system. Such patients are treated as conflicts by the system. The latter of the two patients studies is placed in a special table called Conflicts table.
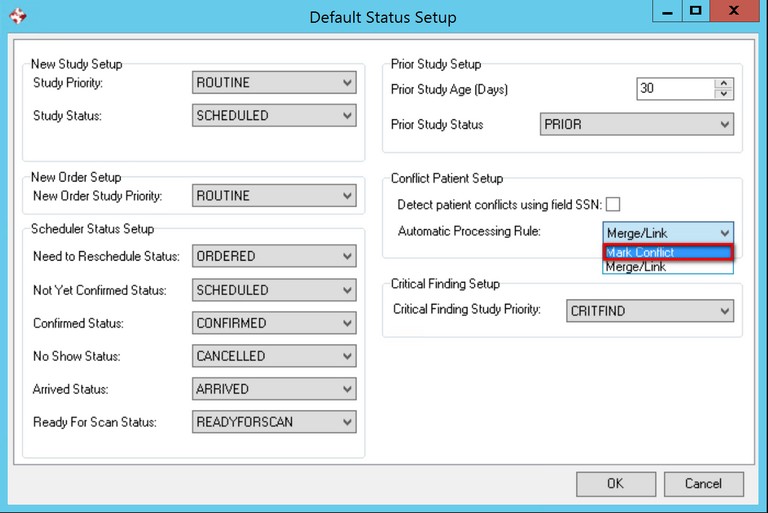
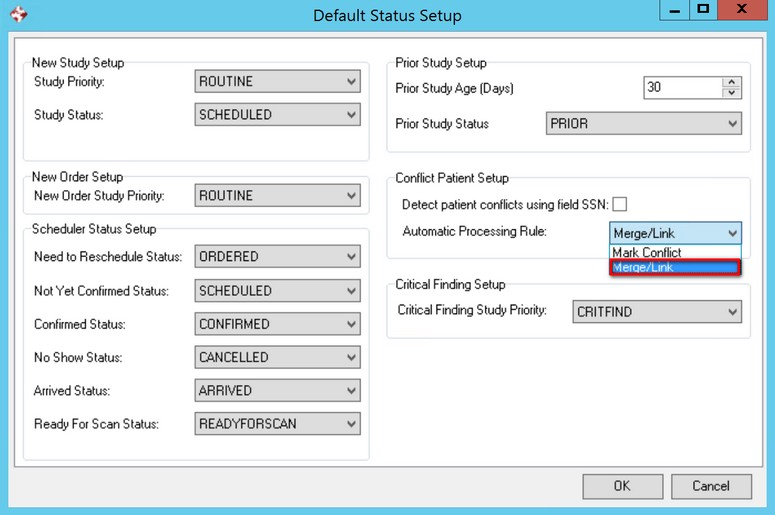
The Conflicts Patient Setup section identifies studies that are potential conflicts. There are two options in this setup: Detect Conflicts for Patients with same SSN and Automatic Processing Rule.

The Detect Conflicts for Patients with same SSN option will detect any two studies in which the SSN or Health Card numbers of two patients are identical. The study which arrives second will be considered as a conflict and placed in the Conflicts table.
The Automatic Processing Rule provides two choices: Mark Conflict or Merge/Link.
If the Mark Conflict option is chosen, the study which arrives second will be placed in the Conflicts table to allow manual conflict resolution.
If the Merge/Link option is chosen, the conflicting patient will be merged or linked with the existing patient.
- The system will link two patients that have the same credentials but different Patient ID and Issuer of Patient ID.
- The system will merge patients which have the same credentials but different Patient IDs.
The Critical Finding Setup section
Critical Finding deals with adding or modifying the priority of studies. Once a study has been flagged, it creates a separate entity for Critical Findings. Its priority will be either CRITFIND, CRITTEST, STAT, HIGH, MEDIUM, or ROUTINE depending on whichever priority is chosen. A Study is flagged when the user clicks the Exclamation Button in the Report Module or the Dictation Module.
The Critical Finding Setup section of the form deals with assigning a desired priority to studies with critical findings.

Clicking the Critical Finding Study Priority drop down menu will open a list of priorities.
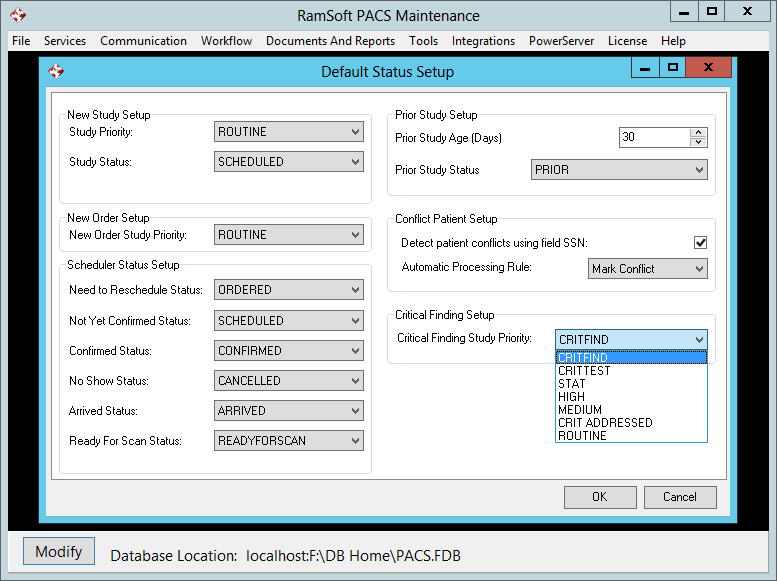
Select the desired priority and click OK.
It is recommended that all services must be restarted to allow these settings to take effect.