Configuring Routing / Triggers
Routing of studies refers to the system automatically sending studies to remote stations such as other DICOM devices or PowerReader clients. Routing is triggered by an update to any of the following fields associated with a study:
- Status
- Modality
- Body Part
- Facility
- Reading Physician
- Referring Physician
In order to determine which changes and what values should trigger routing, you will need to set up routing rules. This is performed through the routing rules dialog which is accessible by clicking Settings > Server Settings > Workflow and then choosing the Triggers tab in the Study Workflow form.

In order to create a new routing rule:
-
Press the New button in the upper half of the screen. This will create a new entry in the list of Routing Rules.
-
Choose the Status that will trigger the rule. Even though a change in any of the other fields can trigger a rule, those fields are normally static, so the Status field is the most common reason for a routing rule to start.
-
Enter values for any of the remaining five filters as required. For example, if this rule should route all studies that have a specific Referring Physician, simply choose that physician from the list and leave all the other filters as %. This indicates that all values for that filter will be accepted.
-
Once you have configured the rules as desired, click the Save button.
Next you will need to choose the destinations that this rule will be sending the studies to. To choose the destinations:
-
Make sure the Destinations tab is selected in the bottom half of the dialog and the desired rule is highlighted in the list of Trigger Rules.
-
Click the New button to add a new row to the Destinations area.
-
From the Destinations drop down menu choose the desired machine. (If you wish to route to a PowerReader / PowerCache, you will first need to change the Type from DICOM Station to Client. This will change the list under Destinations from all the available DICOM stations to all the available PowerReader clients).
-
Choose whether relevant prior studies should be routed along with the study that triggered the routing rule. Indicate this decision with a Y or an N in the Route Prior column.
-
Finally, choose what types of objects get routed by selecting the recipient from the Recipient drop down menu.
TIP: There will be situations when users on Client stations only need access to certain object types. Instead of routing every object to them, it is possible to limit the objects they receive based on their user privilege. This helps reduce bandwidth usage and speeds up "push" to cache. (For example, if a transcriptionist only has the Play Audio privilege, then only AU objects from the study will be routed to the destination Client station when the transcriptionist is selected as a recipient).
For routing specific objects to a Client station, select a user from the Recipient drop down menu, or leave as <none> to route all objects. When routing to a DICOM station, the Recipient drop down menu is disabled and the value is set to <none> since routing based on user privileges is not applicable. Click the Save button to save the destination. This will trigger only the specific type of objects that the selected recipients needs. If you would like this rule to apply to multiple destinations, simply add new entries to the list.
NOTE: The ability to route priors is disabled when a user other than <none> is specified.
If this rule should only start during certain days of the week, or during certain hours, click the Schedule tab to configure those details.

By default the option Allow routing any time is chosen. However, if the rule should only execute during certain hours every day or at a different time each day, one of the following other options will need to be chosen. Choosing the Start routing in the time range from option and selecting the hours will cause the rule to work everyday between those hours. If your scheduling is even more complicated and is tied to days of the week, you will need to choose the Schedule week days option.
In order to activate routing on a specific day, press the corresponding button. Next choose the time frame during which the routing should take place. If the rule should not start on any day, ensure the button for that day is not pressed.
Configuring Relevant Priors Query Source and Schedule
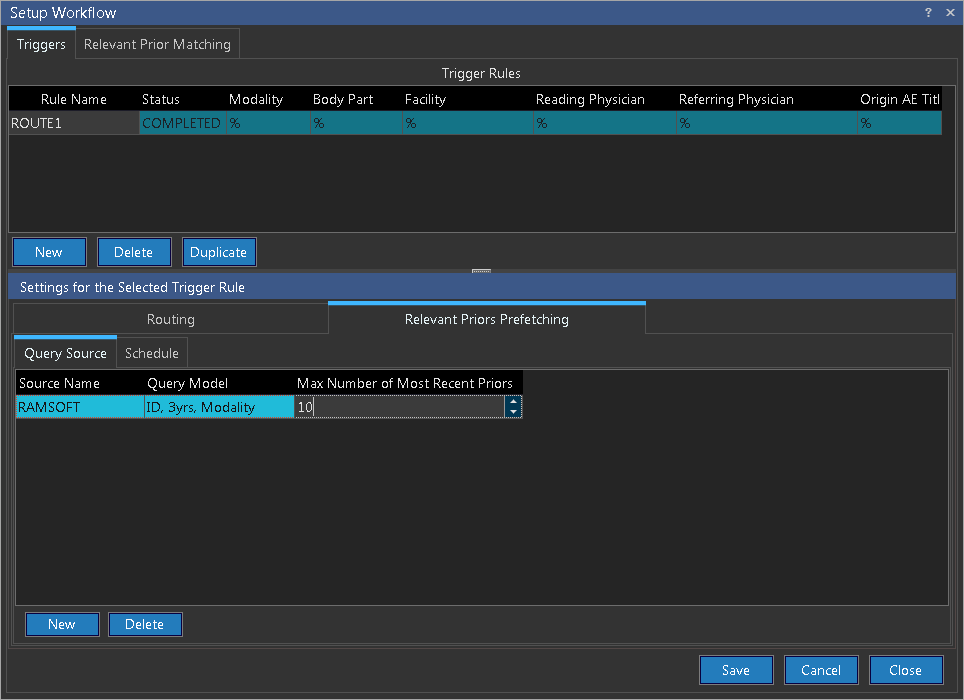
Query Source
The Query Source specifies the DICOM entity in which to search for relevant priors. In the Configure Triggers section, if you have selected Y in the Route Prior section (refer to Configure Routing / Triggers above), you will need to select the query mechanism that should be used. In order to select the query mechanism:
- Click the Query Source tab.
-
Next, click the New button to add a new entry to the list.
-
Choose the source you would like to search for priors on.
-
Select the Query Model to use when searching that source. (If you have not defined any query models yet, see the Prefetching Priors Overview for details).
-
Click the Save button to save the source.
-
Add any other sources that should be searched and couple them with the appropriate Query Model.
Schedule
In the relevant priors Fetching phase, Gateway performs DICOM Query and Retrieve operations against the configured Sources. The Fetch is done first to import all candidate studies into the local Gateway, so that all relevant fields can be reliably found. (See the How Do I Configure Prefetching of Priors? section for more details).
In most cases, the candidate studies do not need to be transferred to the local Gateway immediately, as the referenced study may not be started until some time in the future (i.e. tomorrow or later). Transferring the candidate studies from the Query Source to the local Gateway right away causes unnecessary load on the network. Typically, the prefetching of candidate studies from the Query Source to the local Gateway can be configured to only occur at non peak hours at the clinic.
In order to prefetch the candidate studies:
-
Select the Schedule tab
-
Click on Only perform prefetching in the range and enter the time range in which you want prefetching to occur.

Even if the prefetching time range is configured, the system is intelligent enough to prefetch candidate studies immediately should a study be scheduled for the same day.