Setting up Study Statuses
This is the first area that needs to be configured when setting up the workflow. Every study that resides on the RamSoft system has a status associated with it. This status helps users identify what tasks have been performed on the study so far and who should be interacting with it next. Furthermore, when other aspects of the workflow are configured, a study's status determines the stations and users it should be distributed to and the level of access for different users.
The status concept is very common in medical imaging, so it is important to coordinate the statuses used by the PACS with those used by any other medical systems such as a RIS, HIS or other clerical software. Furthermore, the statuses used should be clear to the system users and simplify the clinical workflow instead of complicating it. Before configuring the statuses, it is important to research all of the areas above and develop a proper plan.
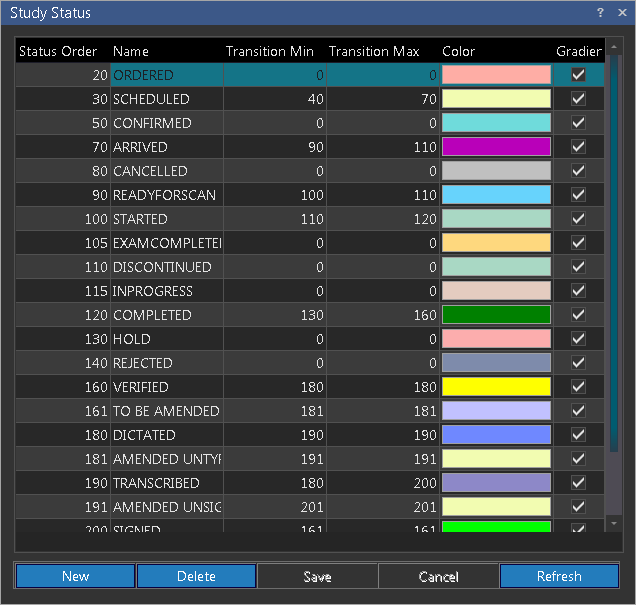
Once you are ready, you will need to launch the Study Status dialog. This dialog is accessible by clicking Settings > Server Settings > Study Status.
The Status Order dialog determines the sequence of statuses. For example, a STARTED status usually comes before a READ status so it should have a lower order value. The actual numbers used for the Status Order are insignificant as long as they are in a proper sequence. The only exceptions to this rule are outlined in the table below.
| Order Value | Default Status Name | Impact on System Workflow |
|---|---|---|
| 30 | Scheduled | User definable. |
| 100 | Started | Started receiving DICOM files. |
| 115 | In Progress | Study is being received through DICOM communication. |
| 120 | Completed | Completed receiving DICOM files. |
| 150 | Verified | User definable. |
| 160 | Preliminary | User definable. |
| 180 | Read | User definable. |
| 190 | Reported | User definable. |
| 200 | Approved | User definable. |
The order values above cannot be deleted due to their impact on system Workflow. However, the status names can be changed. The names are only used by the users and have absolutely no impact on the behavior of the system. The software relies solely on the numerical values.
The first step in setting up statuses is to create the statuses as per the developed plan and remove all the unused ones from the list. When transferring the planned statuses into the list, you will need to ensure that the numbers assigned are in a proper sequence. A quick and easy way to create the desired statuses is to simply rename some of the existing entries instead of creating new ones.
The steps involved in adding a new status are; setting the order value, giving the status a name and then choosing the transition values and color. The transition values determine the range of statuses that the study can be changed to. It is meant for the status change option which is available in the right click menu of the Worklist. The preferred color will be used as the background color for any studies appearing in the Worklist with the said status.
RELATED TOPICS