Adding New DICOM Station
Before you can add a new DICOM Station, make sure you have the AE title information for that station, as well as the IP address and port(s) that it uses for DICOM communication. It is also very likely that the same information about your RamSoft station will have to be entered into the remote station before communication can commence.
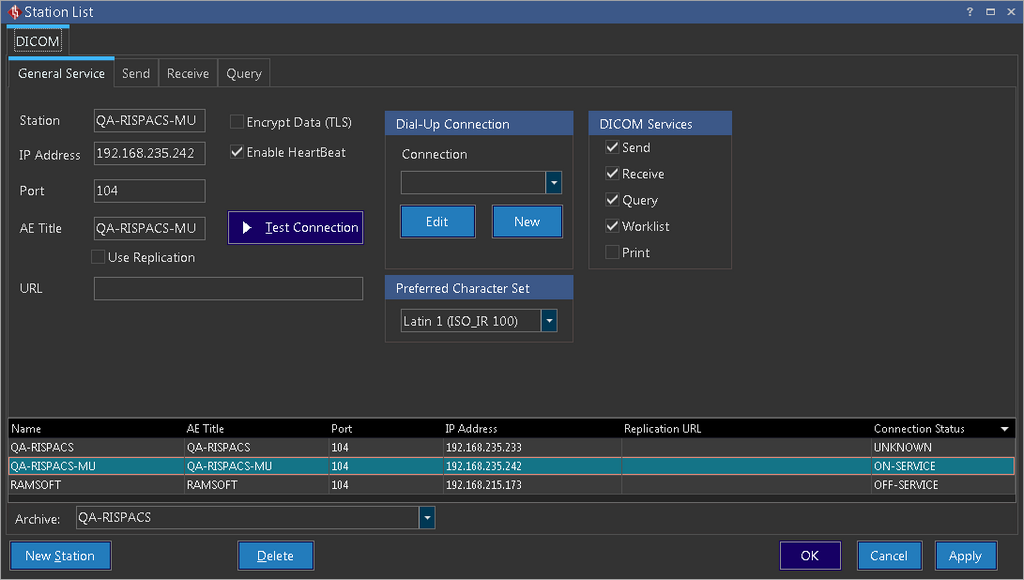
To add a new station, launch the Station List by clicking Settings > Server Settings > Station List.
Once the Station List form appears perform the following steps:
-
Click the New Station button at the bottom. This will bring the cursor to the Station text box.
-
Enter a name you would use to identify the new station. This name is not predefined and should be something that will make the station easily recognizable to a human user.
-
Enter the IP Address and the Port which the station will use for DICOM communication.
-
Enter the AE Title of the station.
-
If you wish to have the DICOM communication encrypted, check the Encrypt Data (TLS) option.
-
If you would like DICOM Heartbeat activated for this station, check the Enable Heartbeat option.
-
If this connection is done over a phone line, you will need to choose the connection from the Dial-Up Connection menu. If a Dial-Up Connection is configured, the system will dial the connection number, connect, perform the DICOM tasks it has been given and then hang up.
-
Select the DICOM Services this remote station would support. The Receive checkbox would allow your RamSoft station to receive studies from a remote station, while Send checkbox would allow the RamSoft station to send studies to a remote station. Finally, If the remote station would be servicing DICOM queries, the Query checkbox should be checked.
-
Once you have added the station, click the OK button to complete the task.
Note: Advanced configuration options become available for each of the three DICOM services after they have been selected. These advanced configuration options can be accessed by clicking on a tab with the corresponding service name. For example, in the above image, all the three services have been given to the remote device and thus three tabs i.e. Send, Receive and Query appear next to General Service tab. Choosing the Print service would display the advanced configuration options for the print service.
TIP: DICOM communication with the new station can be tested by highlighting the station in the list and clicking the Test Connection button. A pop up message would indicate the success or failure of the communication test. If the connection test has failed, the Resolving Communication Issues section provides some troubleshooting tips to resolve the issue.
To learn more about how to configure those advanced options, use the related links below.
RELATED TOPICS