Image Annotations
When study images are displayed in the RamSoft software, they can be overlayed with annotations. These annotations display various DICOM tags, such as Patient Name and Patient ID. By default, the software displays a default set of annotations over each image, in order to associate each image with its series, study and patient. These default values can be modified if the site needs to display additional tags or remove existing ones. Modifying these default values can be performed through the Setup Viewport dialog, which allows for full customization of what the system will display over the images. This includes displaying DICOM tags as well as written text. It is launched by clicking View > Setup Viewport.
Image Appearance
Since all images displayed on screen are re-sized, an interpolation scheme is needed for that purpose. The interpolation scheme is launched by clicking View > Setup Viewport > Image Appearance section. The defaults can be viewed and changed in the Setup Viewport dialog. For more information on changing image interpolation quality, see How Can I Change Image Interpolation Quality?.
Organizing Display of Annotations:
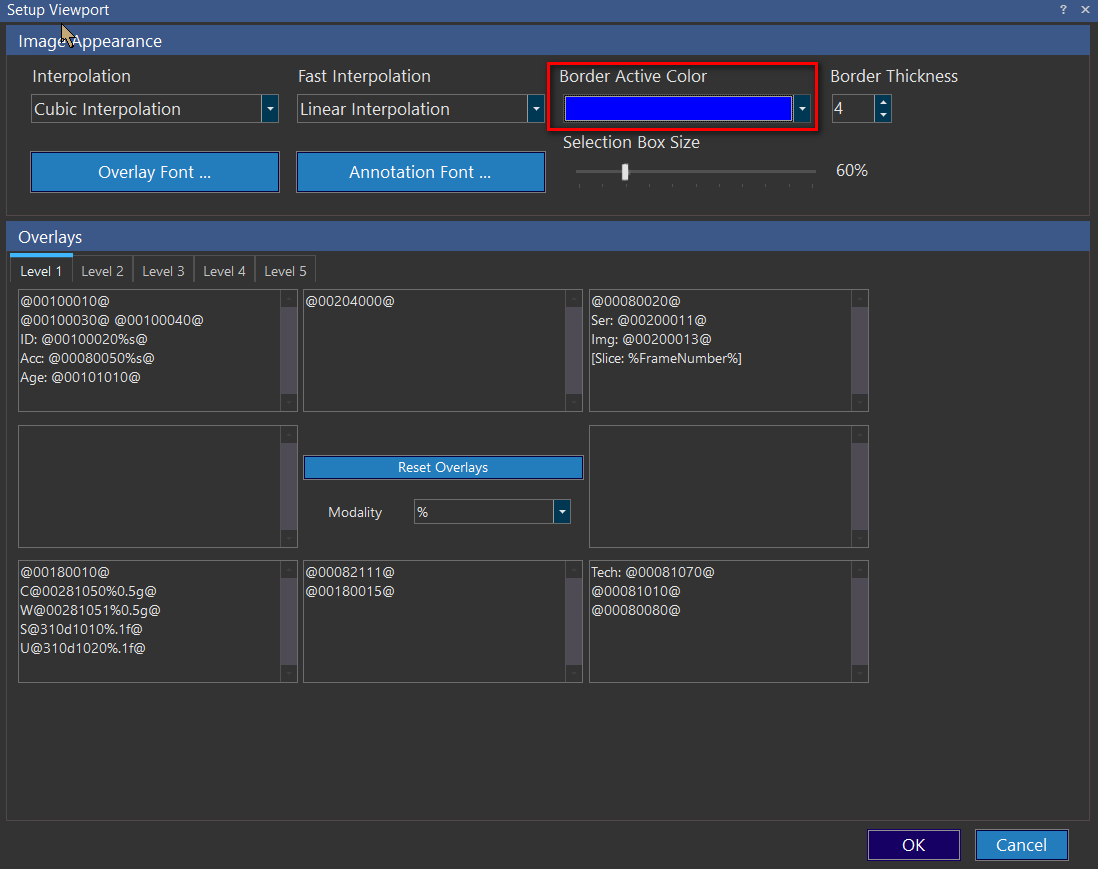
Setting up default annotations involves deciding where on the images the annotation information will be displayed, as well as what details will be displayed. The annotation menu contains eight annotation input fields. The layout of these fields in the annotation menu corresponds to the layout of the annotations on the actual image. This means that the annotations in the top left input field will be located in the top left corner of the image, the ones in the bottom right entry field will be displayed in the bottom right corner of the image, and so on.
Any text will be displayed as is, unless it is a DICOM tag number. In that case, the information stored in that DICOM tag will be displayed. To enter a DICOM tag place it in between @ symbols. For example to display the contents of the Patient ID tag enter: @00100020@. DICOM tag values can be obtained from the DICOM dictionary. A copy of it can be found in the RamSoft service manual.
| Annotations | Information populated by RamSoft |
|---|---|
| AcquisitionMatrix | Input as @00181310%vm@ into the annotation box. Add a value after VM to specify which value of the AcquisitionMatrix to show. For example, if the AcquisitionMatrix was 0\384\224\0, if 224 was the desired display value input a 3 after VM to get @00181310%vm3@. If you want to display the entire tag, you need to ensure that the suffix "%vm" is added after the tag. |
| SpacingBetweenSlices | Input as SLICE:@00180050%.1f@ GAP:@00180088%.1f@ into the annotation box. |
| FrameNumber | Insert %framenumber%. to display the frame number of each frames and add @00280008@ for the total number of frames. For example, [Frame: %framenumber%/@00280008@] will display as Frame: 1/25 (frame 1 out of a total of 25 frames). |
| Subtags | To display text annotations that are sub tags of another annotation in the DICOM Header insert the annotation it is sub tag of, followed by '>' sign and then the sub tag number of the sub tag you wanted to display. For example if wanted to display (0018,1180) from: (0054,0022) SQ (Sequence explicit length #=1) (fffe,e000) na (Item with explicit length #=5) (0018,1180) SH [300keV parallel] (0018,1180) is a sub tag of (0054, 0022) in order to display as 300keV parallel in viewport input @00540022>00181180@ into the annotation field. |
Date/Time Annotation Overlays
The Date/Time annotations displayed for Level1 and Level 2 modalities by default are the Study Date/Time annotation and the Date/Time annotation with the attribute "Acquired".
The Study Date Time/Time annotation on the upper right corner of the viewport follows the Study Date (0008, 0020) format while the Acquired Date/Time annotation is displayed at the lower right corner of the viewport and its value is based on the date/time algorithm derived from Acquisition Datetime. For more information on the logic for displaying the Date/Time Annotation Overlays, refer to the topic How Do I Modify What Annotations Overlay My Images?.
Annotation Levels
When images are displayed in large view boxes the annotations can be read easily and are quite helpful. However, if a large number of images are displayed on the screen, each image becomes quite small and a large amount of annotations can interfere with a diagnosis. Turning off annotations will solve this issue however that also removes information that is useful during the reading of a study.
As a solution to this problem, the software uses the concept of levels. The user is allowed to define backup annotation levels, where each subsequent level contains less annotation information than the last. If the current annotations are colliding with each other or with the image, the next annotation level is displayed. For information on how to create and modify levels, see Working with Levels.
Modality drop-down Menu
The annotation information can be configured differently for each type of modality. When changes are made to any of the input fields in the Annotations menu, these changes will only apply to studies of the modality type visible in the Modality dropdown menu. If the % is chosen the changes will apply to all studies.
Reset Overlays Button
This button will reset the annotation modifications for the current modality to the settings defined in the % sign selection. This reset will include the removal or addition of levels to match the % definition and modifying each backup level accordingly.