Installing and Configuring Active Fax (ActFax)
ActFax is compatible with RamSoft software and allows users to send and receive faxes. This is a very useful tool which can cut down on overhead time by streamlining faxes.
It is recommended to install ActiveFax Server on a dedicated server.
Installing Fax Hardware (optional)
- Install the fax board into the fax server.
- For Brooktrout / Dialogic TR1034 board: a. Download and install the driver from the location http://www.actfax.com/download/bfvsetup_tr1034_671.msi. This driver needs to be installed on the fax server to use this fax board. b. Install the 64-bit driver add-on from the location http://www.actfax.com/download/bfvsetup_tr1034_x64_671.msi. c. Reboot. d. Configure the Brooktrout device driver from the Device Manager.
Installing ActFax Server
Perform the following steps to install ActFax Server:
- Download Firebird ODBC from the location: http://www.firebirdsql.org/index.php?op=files&id=odbc.
- Install Firebird ODBC drivers
- Download and Install the ActFax executable 64-bit file from the location http://www.actfax.com/download/actfax_setup_x64_en.exe. Run the ActFax installer and choose Complete Installation.
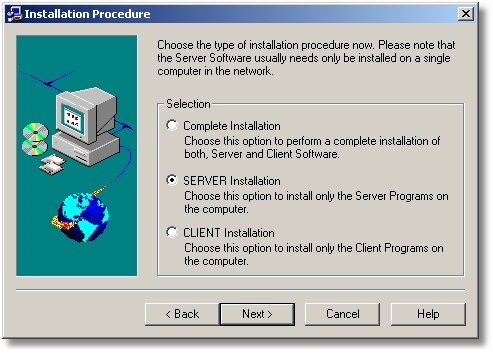
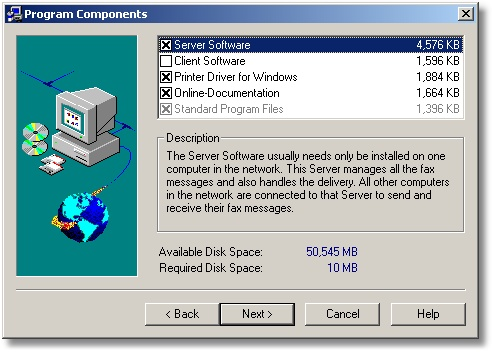
- Click Next. The Program Components window appears.
- The basic required options are selected by default.
- Create a folder named Outgoing Fax in the folder ActFax\Server. Ensure that the report distribution service has write privileges to this folder.
- Open the Firebird ODBC through Control Panel > Administrative Tools > Data Sources (ODBC).
- Create a System DSN by the name PACSFAX.FDB.
warning
-
Database Name should follow the following format: <PowerServer/Gateway Name>: <Full Path of FDB File on PowerServer/Gateway Computer>
-
Database password should be a database account created on the PowerServer machine with select privileges for the ACTFAXPROTOCOLQUEUE table.
- Select the option to start the fax server automatically during system start up. In this case, the fax server is started as a service after the system boot.
- Turn on the modem and initiate the fax server.
- If there is only one Area Code that requires dialing with just the local number (7 digits in North America), then specify the Local Area Code.
- If there are Area Codes that require dialing with the "area code+ local number" (10 digits in North America), then specify the Local Area Codes.
- If there are area codes that require dialing with a mix of local and local distance dialing (7,10,1+10 digits in North America), then Enable Dialing Rules and configure them in the following format:
| a) | ### - ??? - ???? to ???-???? only dials the ? digits (7 digits in North America) |
| b) | ### - ??? - ???? to ### - ??? - ???? only dials all digits (10 digits in North America) |
| c) | ### - ### - ???? to 1-### - ### - ???? dials all digits with a long - distance prefix (1+10 digits in North America |
- On the right panel, click on ODBC Database.
- Change the Data Source to PACSFax.fdb (Firebird/InterBase(r) driver).
- Click Test Connection. A message appears confirming that the connection has been successfully established.
- Click on the Transmission Protocol tab and select Enable Export of the Transmission Protocol checkbox. The Table field on the right should change to ACTFAXCONTROLQUEUE.
- Click OK to close ODBC Database.
- On the right panel, click on File System.
- Click New.
- Click Search Directory, and then navigate to the OutgoingFax folder that was created in Step 6. Change File Extension to PDF and click OK.
- Repeat steps 19-20 but instead, set File Extension to CTL.
- Click OK to close File System Properties.
Configuring ActFax Integration
- Open IBOConsole or Database Workbench.
- Create a new database user (i.e, ACTFAXUSER).
- Grant the user all privileges on the ACTFAXPROTOCOLQUEUE table.
- Click Run.
- Open Maintenance through Start > Run > Maintenance.exe
- Enter the Maintenance password.
- Go to Communications > Fax Settings.
- Click on the Active Fax radio button at the bottom of the fax settings form to select it as the default fax server.
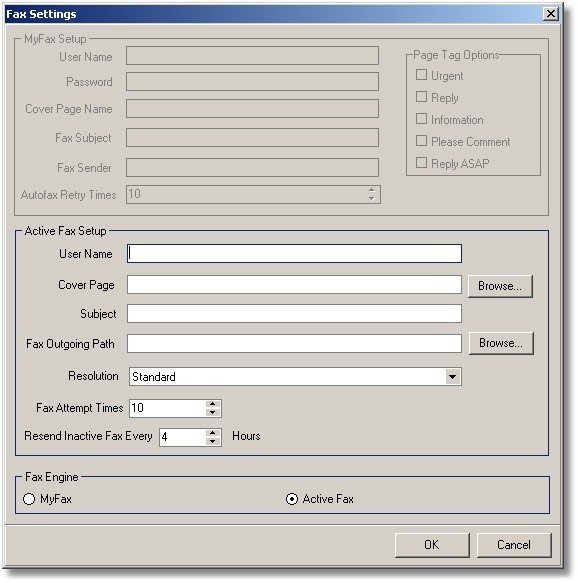
- Set the Fax Outgoing Path to the Outgoing Fax folder created in step 6 in the previous section.
- Set Cover page to a template document which would be used as the fax cover page in each fax.
- Set the username as a unique identifier for PowerServer. If multiple clients are using the same ActFax server, this identifier can be used to identify the origin of the fax.
Testing the ActFax Integration
- To send a test fax, open PowerReader/Gateway.
- Create a study with at least two reports: one text and the other a Word report.
- Right-click the study and select Send Fax. Fill the Last Name, First Name, and Fax Number. Click the Send button.
- Open Settings > Logs > Communication > Fax Log tab. The fax process should go through the following statuses: Scheduled > Waiting for Process > In Progress > Fax Completed.
- Verify that the received fax has the correct number of pages and information contained in the fax cover page is correct.
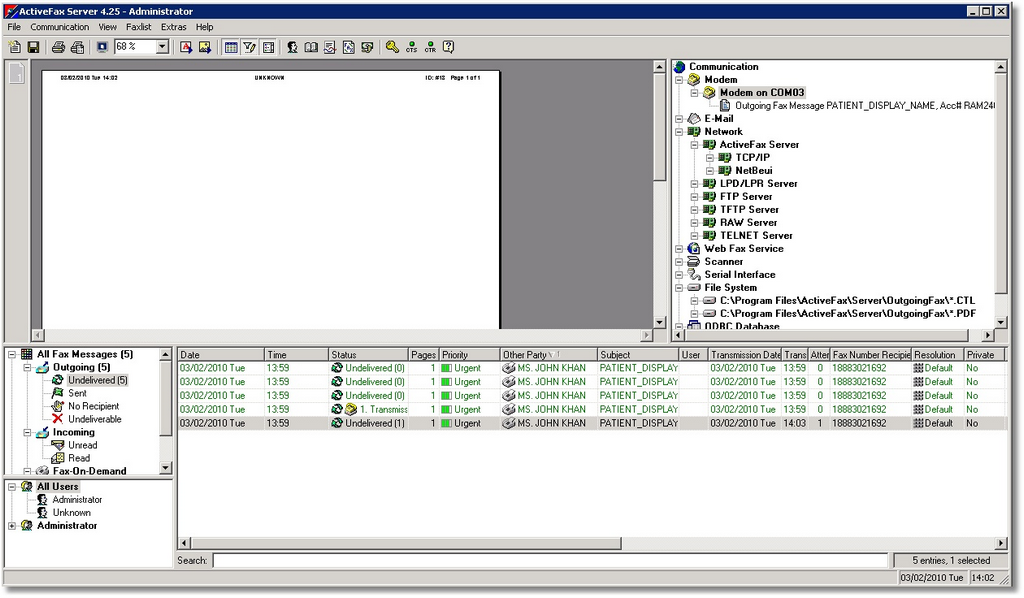
- On the server, open the ActFax Server program. Verify that the fax is in Outgoing > Sent category.
- Double-click the fax item in the list. Go to the Settings tab and verify that the following parameters have been populated correctly: a. Under Recipient: Name, Fax b. Under General: User, Subject, Cover Page c. Under Transmission Parameters: Resolution These parameters were defined in the Fax settings dialog of Maintenance.
- On the client, open Maintenance.
- Enter the Maintenance password.
- Go to Communication > Fax Settings and set the Fax Attempt Times to zero (0).
- On PowerReader/Gateway, open the study again, then select Send Fax and fill the Last Name, First Name. Enter an invalid fax number or un plug the phone line.
- Click Send.
- Open Settings > Logs > Communication > Fax Log Tab. The fax process should go through the following statuses: Scheduled > Waiting for Process > In Progress > Failed. The Detail column of the Fax log should give the correct reason for fax failure.
- Verify that the fax has moved from the Pending sub-tab to the Failed sub-tab.
- On the server, open the ActFax Server program. Ensure that the failed fax is in the Undeliverable category.
- Open Settings> Logs> Communication > Fax Log Tab. In the Failed sub-tab, click the Resend button.
- Verify that the fax is moved from Failed sub-tab and into the Pending sub-tab again.
- Open the ActFax Server program and verify that the failed fax is moved from the Undeliverable category to Undelivered category.
- Open Settings > Logs > Communication > Fax Log tab. In the Pending sub-tab, select the tab and then click the Delete button.
- Verify that the fax has been removed from the Pending sub-tab.
- Open the ActFax Server program and verify that the selected fax has been deleted.