How Do I Block a Time Entry in the Scheduler?
The Blocked Time Entry feature allows you block a time slot of one or more modalities available in the facility. Upon blocking, that particular modality could be used to perform a study and hence patient could not be scheduled. The blocking of one or more modalities could be due various reasons and circumstances. The blocking frequency could be either daily, weekly, monthly or yearly. Users who have the block time privilege could to set up new and edit existing any block time entries.
Prerequisite:
To block time of a modality, you will need to possess Block Time checkbox to be checked as a privilege for your login. Possessing the access privilege depends on your roles and responsibilities.
This feature is different from the block time feature available in the appointment book.
The feature is available through RIS Settings > Block Time Entry. Blocked Time Entry List screen appears as shown below.
Once the privilege has been granted, choosing the Block Time Entry option will open the Blocked Time Entry List. Users will only be able to block time for resources that belong to their own facility.
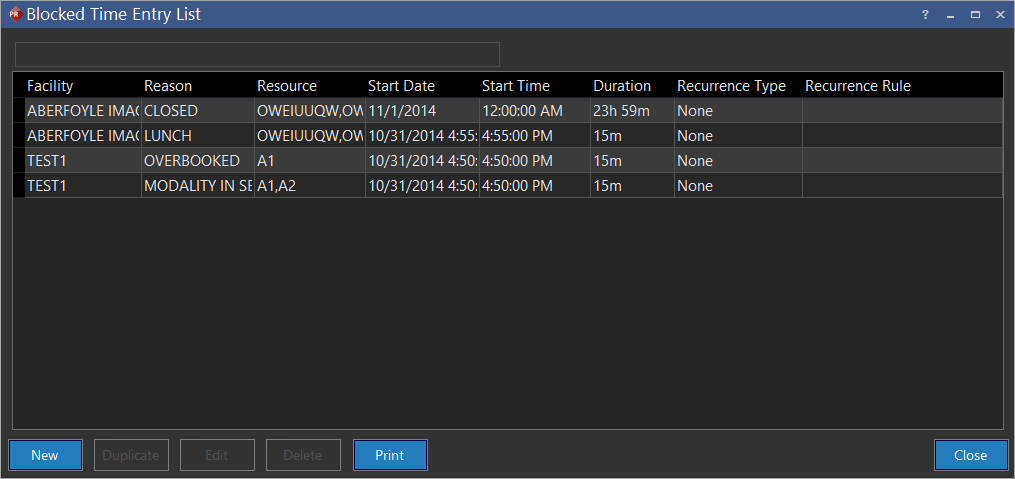
The Blocked Time Entry form contains a search field at the top which allows you to search any entry by either the facility name, the reason for blocking the resource or the resources which are blocked. A table containing all the entries is displayed below the search field. The table also displays any blocked times that were created by users by right clicking on the scheduler and choosing the Blocked Time Entry. If you wish to see an entry in detail, high light it and double click it to view the details. You can print the list, edit info, save, add and delete block time entries by using the buttons at the bottom of the menu. If a blocked time is scheduled to recur multiple instances, deleting it will also delete the original blocked time from the scheduler.
In the Blocked Time Entry List the entries which are current have started already are displayed in blue. The blocked time entries which have expired (started on their due time and ended) are displayed in gray. Any other entries which will happen in the future are displayed in black.
The table displays the Facility which has the blocked time entry. It also displays the reason for the entry, the particular resource of the facility which has been blocked for the time period, the date when the blocked time entry will start and its duration. The recurrence column describes the pattern of the recurring time block, i.e. daily, weekly etc and then the particular rule defined for the recurrence is displayed in the next column. For example, if an entry occurs yearly on the first weekday of every April, the Recurrence Type column will display "Yearly" while the Recurrence Rule column will display "Recur Every year on The First Weekday of April".
Creating a Blocked Time Entry
To create a blocked time entry, click New in the Blocked Time Entry List screen. Modify Blocked Time Entry form appears as shown below.
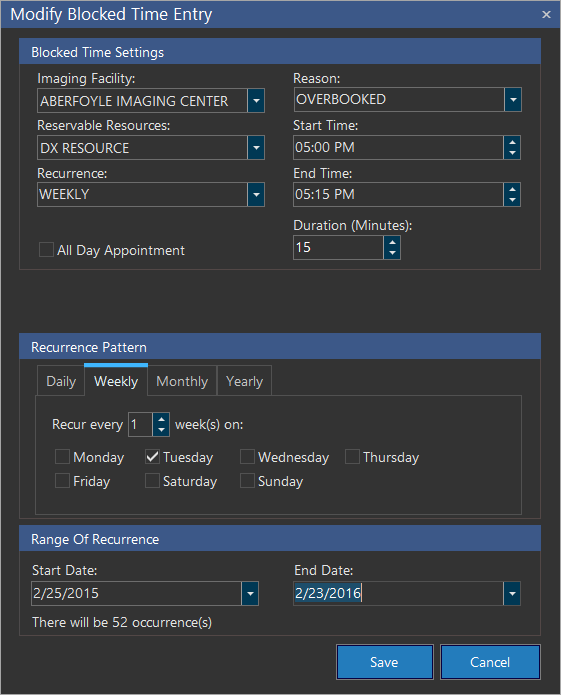
Choose the Imaging Facility where you will like to block the resource. The selection of an Imaging Facility is mandatory.
Blocked Time Entry option is only available for Imaging facilities as they are the only type of facilities with resources defined for them. Also, the Reservation option must be selected inside the Resources form of the imaging facility. If this option is enabled in the resources form, the imaging facility will be available in the Imaging Facility list of the Blocked Time Entry form.
A drop-down menu of all facilities allow you to choose the specific facilities to block or you can select all the available facilities. Select the resource you would like to reserve from the Reservable Resources: option. The selection of a Reservable Resource is mandatory.
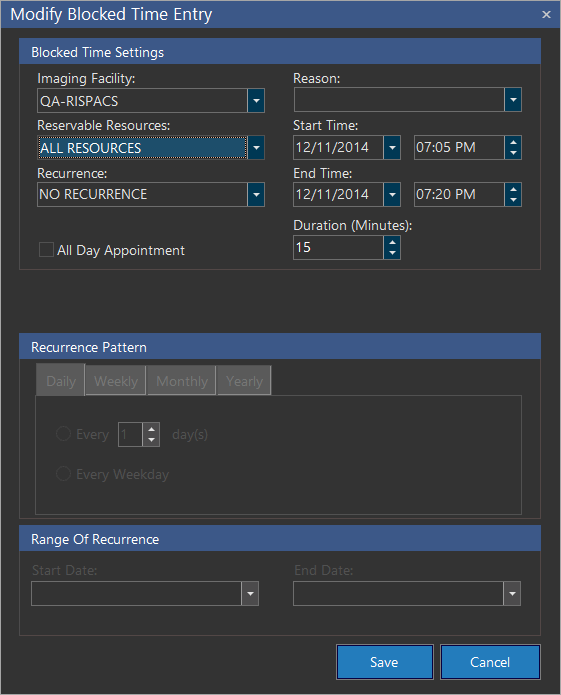
You have the option of blocking a particular resource or all the resources in a facility. If multiple facilities have been chosen, the resources of each facility will be visible along with the facility name. Once the resource has been chosen, select the Reason for blocking this time. You can choose a particular reason from the drop-down menu or type a different reason if needed. You can also leave this field blank if desired.
Selecting a recurrence pattern for the blocked time
The Recurrence option is the once which allows you to determine the frequency of the occurrence for the event. A blocked time entry can have a recurrence of Daily, Weekly, Monthly, Yearly or Not have a Recurrence at all.

The No Recurrence option is default. The bottom portion of the screen (Recurrence Pattern) changes according to the option chosen in this drop-down menu. If you choose to create a Daily Blocked Time entry, the menu at the bottom allows you to determine if the Blocked time entry will recur every weekday or after a specific number of days. The number of days can be chosen as the start and end date of the recurrence is chosen by the Range of Recurrence option at the bottom.
You can choose to have a start date and an end date. A recurrence without an end date will keep on occurring until an end date is specified. A message at the bottom of the screen displays the number of occurrences for the block time. You can choose the start and end time of the time block and then click Save to save the entry.
A Weekly Recurrence will occur on the days specified and for the time duration specified in the entry.
If the user chooses not to define an End Date, the block time will keep recurring on the days specified until an end date is specified by the user. The user has the option to choose an All Day Appointment which will block the entire day for the entry.
This option will disable the start and end time option as it is no longer needed.
Choosing the Monthly option opens a different menu at the bottom.
The user can choose for the time block to occur at a specific day of a specific month or choose a different time frame (e.g. weekday) for the entry. It should be kept in mind that selecting a "weekend" option does not block both Saturday and Sunday. Every Saturday and every Sunday is considered an individual weekend. Therefore, to block the entire weekend, two entries must be created.
The Yearly Blocked time entry will create an entry which can recur at the date, time and year specified. The user can choose to have the time block recur every year at the date and time specified if they do not define an end date.
A blocked time entry which occurs only once can be created by choosing the No Recurrence option in the Recurrence drop down menu. Choosing this option will allow you to choose a Start and End Date and Time for the event. This option disables the Recurrence Pattern subsection in the menu as it is not needed in this case. The user can also choose to create this entry as an All Day Appointment.
Viewing a blocked time entry in the scheduler
The blocked time entry option will block the specified time and date and not allow any studies to be booked in that time period.
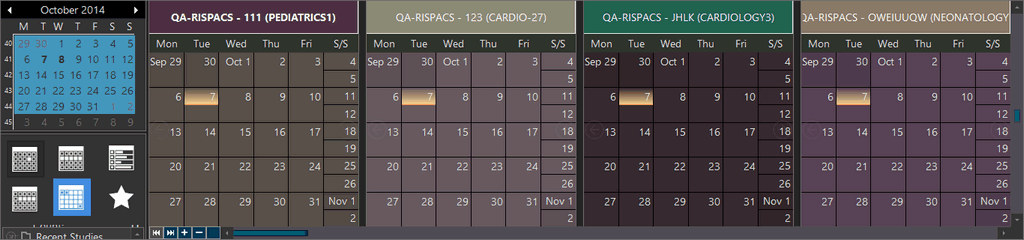
The blocked times and resources are visible in the schedule with the Reason for the Blocked Time and the Name of the creator of the entry.
Based on the booking of a modality in a facility to conduct a study, the appointments are scheduled. The appointments are classified based on the dates as desired by the patients for any defined modality. The application displays previous and next appointments. This would facilitate you to move back and forth between appointments.
The block time can be used to block a resource for multiple days. Hence the resource can be used to block the resource for the time period specified. The resource will be displayed with a a slight difference in the scheduler.
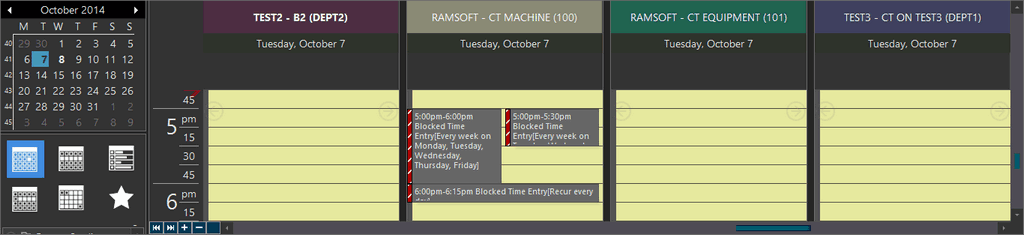
A blue border is also displayed for the time duration taken by the study/block. Also the scheduler will be grayed out for the time period specified. The user cannot enter any data in the blocked time period.
If the end time for the blocked time entry is beyond the max time allowed by the resource, the system will shorten the blocked time's duration and end it at the resource closing time. However, if the blocked time entry is entirely beyond the resource time (starts and ends while the resource is closed), the system allows the blocked time entry without shortening the time period. The system issues a warning at such a blocked time entry.