How Do I Configure Display Compression?
Display compression refers to the quality of the images that you user will be provided with, when downloading images using the internet. These settings are configurable on a per study type basis, and each user has the option of choosing the settings they prefer.
Assigning different compression levels
The first stage is the creation of desired compression levels. This is performed by launching the Compression dialog that is accessible through Settings > Server Settings > Compression. The Compression window appears as shown below.
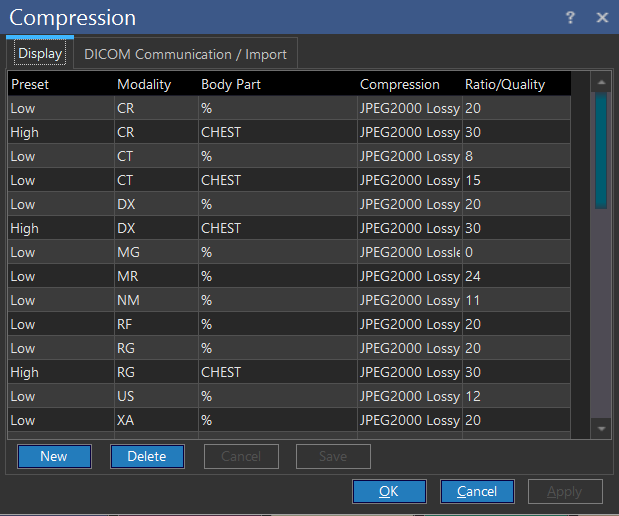
This dialog permits the creation of display compression presets. To create a new preset, click New and enter a name in the Preset column. The name should be easily identifiable to the users of the system. Next choose the Modality and Body Part to be associated with the new preset. The % is a wild card which applies the preset to all possible body parts or modalities.
The Compression field is a drop-down menu listing the various compression algorithms that can be used for the preset. Various lossy and lossless algorithms are available. This menu also contains an option called Default. This will display the images using whatever compression scheme they are stored in. Select the appropriate algorithm for the preset.
The Ratio/Quality field is only used when Lossy compression is selected. For any other compression scheme, the field will have no effect. It defines the compression ratio that will be used by the lossy algorithm. For JPEG2000, an entry of 30 means that the algorithm will use a compression ratio of 30:1. For JPEG Lossy, an entry of 50 means the algorithm will use a Quality Factor of 50. When using a lossy algorithm, the appropriate Ratio/Quality value should be set.
Once a preset has been created, click OK. This will save the preset and make it available to all users.
If you wish to use different compression levels for different study types, create multiple presets under the same name as shown in the picture above. Using that example, when you set compression preference to High, the compression level will vary depending on the study type opened.
Note: If the PowerReader client is connected to the PowerServer via a LAN connection, the system will apply the compression settings according to the compression menu. If the connection to the server is NOT a LAN connection, the user can select the compression settings of each image i.e., High, Medium and Uncompressed.
Selecting compression levels from the view menu
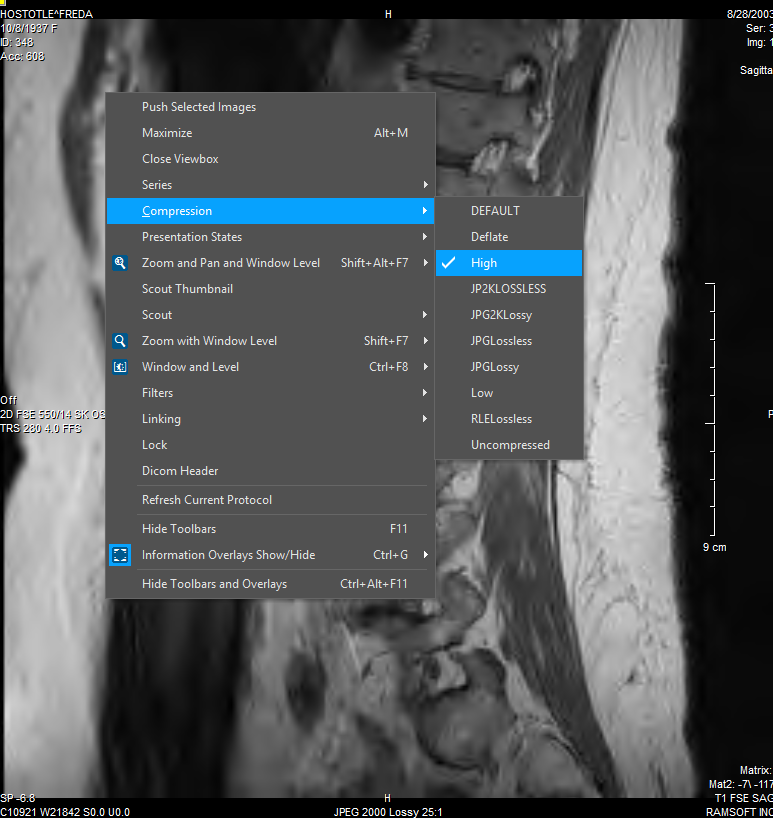
Upon defining Presets, they need to be assigned to users who are not connected to the PowerServer via a LAN connection. Each user can choose their default compression preset from the View menu, by choosing the Compression option.
Inside the Compression sub menu, the desired preset can be chosen. This preset will now be used as the default every time this user logs into the system.
Sometimes a user may want to see a specific image in higher quality than the predefined settings. The user can right click on that image, and from the Compression sub-menu choose the desired compression level.
Note: This option is only available to users whose PowerReader is connected to the PowerServer via an internet connection (a Non-LAN connection).
While in the process of loading images, if a newly selected compression level is of higher quality than the previous setting, images already loaded will be reloaded with the higher quality compression level. If a lower quality compression level is selected, only images currently loading will display using the new compression ratio.
Finally, the system administrator can change a users default compression setting through the User Config table.
To see what the compression of the image is, right click on the image and select Compression in the right click menu.
If a user installs a PowerReader through the internet, the system provides the option of choosing the compression settings at that location.
The system auto detects the connection to the server (either via LAN or internet) and displays the images according to the connection speed. If the connection to the server has been through the internet, the Compression drop-down menu will be active. The user has three options to choose from i.e. High, Low or Uncompressed.
By default, images are JPEG2000 Lossless for LAN and High compressed for Internet. A High compression might display the images much faster as it is transferred faster over the internet but the resolution might not be very good. An Uncompressed image (which will be JPEG 2000 Lossless) might be of the best quality but will take longer duration to transfer from the server over the internet. Once these settings have been saved, the settings can be changed by going to View - Compression and the choosing the desired compression setting.
Note: If an uncompressed image has been downloaded from the server and is available in the local cache, changing the compression level to High will not reload the image in low quality. However, if a high compression image has been downloaded from the server, then selecting a Low or Uncompressed image will reload the image in better quality. In short, inside the viewport, you can change compression level of an image from high to uncompressed but not from uncompressed to High.