Burning a Patient Disc
Often it is desirable to burn specific studies into a CD/DVD.
You can burn studies in RapidResults using the Burn Study  tool from the My Latest Exams or Search screen.
To burn a CD or DVD:
-
Insert a blank CD-R/RW or DVD into the disc drive.
-
Select the desired study/studies from the My Latest Exams or Search screen. Studies that are selected will be highlighted in blue. To select multiple studies hold down the Ctrl or Shift key.
Note that you can burn studies using the BurnCD tool from the Emergency Access screen (if you do not have the privilege to view studies from the My Latest Exams/Search screens) in RapidResults, provided you meet the following criteria:
- You should have the Emergency Access privilege enabled for your role
- You must have tried viewing studies from the Emergency Access screen in the past one hour before you try burning the studies
-
Click on the Burn Study
tool. Clicking the Burn Study tool launches the Media Tools application.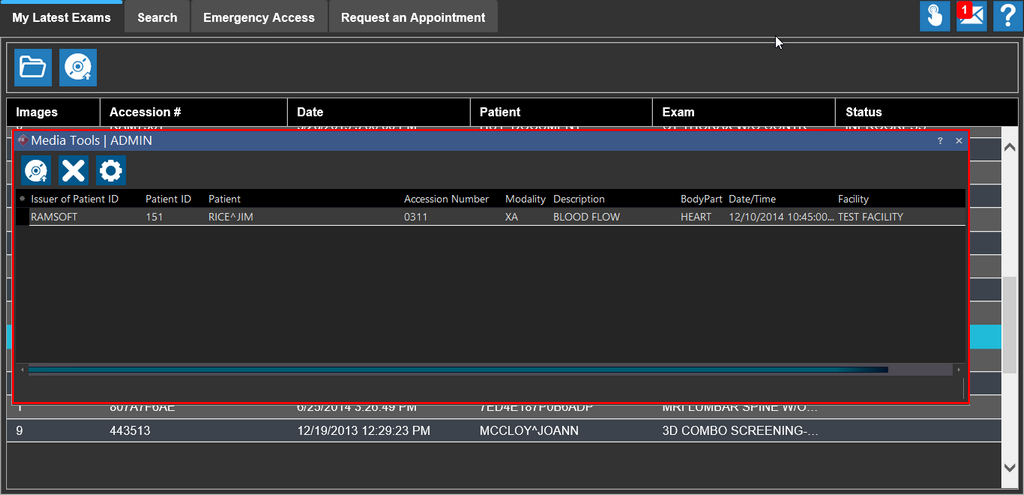
-
Click the BurnCD
 tool on the Media Tools App. The Burn options form is displayed.
-
Check off the options to select desired objects to burn on the disc and then click Burn Study.
Note: The Presentation States Burn option can be enabled or disabled by using the Configuration Entry "CD Burn Always In Presentation State". To enable the Presentation States Burn option, perform the following steps:
i. You need to un-check the "CD Burn Always Burn In Presentation State" configuration entry in the System Configuration. In the Burn Options Form, note that the Presentation States burn option is not yet available for selection.
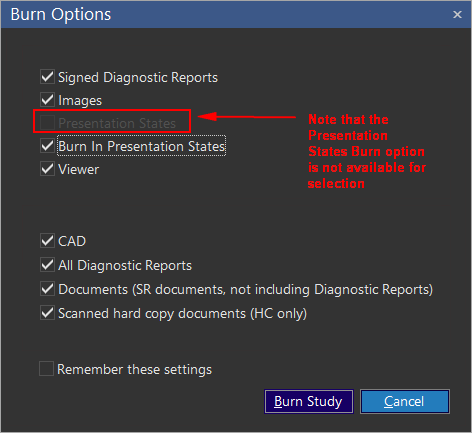
ii. Un-check the Burn In Presentation States Burn option in the Burn Options form. This would make the Presentation States Burn Option available for selection.
iii. You can now select the Presentation States Burn option.

The primary difference between the Burn In Presentation States Burn options is that selecting the Burn In Presentation States Burn option enables you to burn a CD with Presentation States by default while enabling the Presentation States Burn option helps you have control on Burning a CD with or without Presentation States.
-
The Remember my selection option can be checked if desired. When this option is enabled, the system will remember the options selected and check them the next time the dialog opens. A confirmation dialog is displayed.
-
Once the burn process is complete, the CD/DVD ejects from the disc drive.
If you try to burn studies that have already been deleted by a different user in PowerReader, the system displays the error message "No Objects found to burn."
-
The CD/DVD consists of PowerReader CD Viewer, which allows users to view the studies on another system. The CD/DVD will work on any computer that is running the latest version of MS windows. RamSoft software does not need to be installed on those computers. However, you can choose to either include or exclude the Viewer and all associated Viewer Files on the disc. Once you un-check the Viewer option, you can burn the studies as DICOM objects in the standard DICOM folder hierarchy to view them using your custom Image Viewer.
Note: When you burn a study with existing reports (Word, TXT, HTML), the reports are converted and displayed as PDF in the CD Viewer.
You can close the Media Tools application by clicking on the Close ![]() icon.
icon.
You can access the Media Tools settings by clicking the Settings ![]() icon. Once you click this icon, the Setup dialog appears.
icon. Once you click this icon, the Setup dialog appears.

The Recorder field displays the current CD/DVD recorder being used. If you have multiple recorders being used, you can select the desired recorder from the drop-down menu.
You can choose to write the CD/DVD at varying speeds. The following write speeds options are available: Fastest, Fast, Medium, Slow and Slowest.
Compressing images saves space on disk. If you are not sure how the image would get rendered after compressing, you can select the Burn Uncompressed Image option to ensure maximum compatibility.