Scheduler
The Scheduler is used to keep track of the resources and their use. It is like a detailed calendar or planner where events (or studies) can be listed at the appropriate time and date. When enabled, the users are able to view and schedule studies in the facilities they are a part of. However, System Wide Administrators and users who are not bound to any facility will be able to view all facilities in the scheduler.
The Relevant Resource Matching option displays resources matching the Scheduled Modality of the currently selected study in the Worklist.
Users with Schedule Studies privilege can perform modifications in the scheduler. The Schedule Studies privilege can be granted to a user through Users and Facilities > Roles. A user will be able to view the resources for facilities they belong to. To view every resource from all the facilities, a user must have the System wide Admin privilege.
The scheduler is divided into resources and each resource can display multiple days. To select the days displayed, the calendar on the left section of the screen can be used.

The currently selected days are highlighted in grey. Days with a scheduled event are displayed in bold and the current date is displayed with a red box. The month can be changed by clicking on the month name or scrolling to the left or right of the month name. Multiple months can be viewed simultaneously by expanding the bottom or right border of the calendar.
A quick way to change the number of days displayed is by using the built-in presets below the calendar.
 View One Day
 View One Week
 View Time Grid
 View One Work Week
 View One Month
 Show Relevant Resources
Depending on the time scale, each day has a number of time slots, and an All Day Slot located immediately below the date. The white border on the left side of the day changes to red with white stripes for the scheduled time as shown below.
The time scale of the calendar can be changed by right-clicking on the scale and then by selecting the desired interval.

Scheduling a study for appointment
To schedule a study for appointment, right-click in the desired time slot. The various resources of a facility and their timings are determined in the Resources section of the Settings > Users and Facilities > Imaging Facilities tab. (For further information, please refer to the Resources section of the user manual).
Right-clicking the mouse on a open time slot displays the following menu:

To schedule the study which has been currently highlighted in the Worklist, select the Schedule selected study option. This will automatically place the highlighted study in the desired time slot. This option is only visible if the modality of the scheduled study is the same as the one allowed for the resource. If the appointment is associated with a study type, the duration of the appointment will be the same as the duration set for that study type.
When scheduling an appointment, the Default Time Duration (configured in the imaging facility's Resources form) is used to reserve time when no study type has been determined. If the study is associated with a particular study type, the duration of the appointment will be set to that study type's duration. To find out more about study types, see Study Types.
The "Ordered" status value is defined in the System Configuration menu value "ORDERED status value". Studies to be scheduled must belong to this study status.
A second method for creating an appointment is by choosing the Create appointment... option and opening the form.
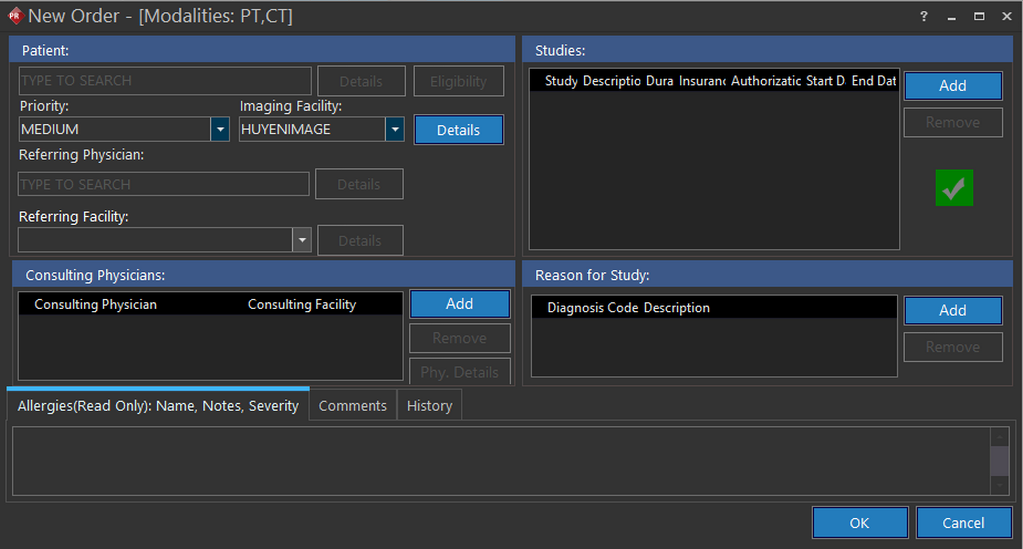
A list of Modalities of the Study Types is available at the top of the New Order form. Appointment for a desired patient can be scheduled by searching the patient in the Patient box. Entering data will create a meta-search which can be based on the patient's First name, Last name, Patient ID, Home Phone Number, Cell Phone Number, Social Security Number or Birthdate. The Referring Physician, Study Type also should be filled in. The Allergies field is read-only and is created from Patient Registration (RIS). Once the study is ready to be scheduled, the OK button is pressed. If a patient does not exist, clicking the New.. link in the meta search will launch the Patient Registration form. Hence the patient can be registered and an appointment created at the same time.
A third method for scheduling a study is by dragging them to the appropriate resource in the scheduler. For scheduling of a study, the resource's modality and the study's Scheduled Modality have to be the same. The study should be at the status of ORDERED (a status below SCHEDULED status).
A fourth method for scheduling an appointment is by double-clicking on a slot on the scheduler. This will launch the New Order form again and then the steps can be followed as explained above.
It must be noted that a patient can not be scheduled at two different locations at the same time. If a study is being scheduled which can last beyond the closing time of the facility, the scheduler will let the user schedule the study, as long as the appointment starts before the closing time. The users are also allowed to extend the finishing time of an appointment beyond the finishing time of the resource.
If two users are attempting to book appointments in the same time slot, the scheduler will block the latter user from booking an appointment. A message prompt specifying that "New Study Order in Progress - User XYZ" is visible. Also, once an appointment has been booked, the appointment cannot be changed through the Study Info form.
Blocking a certain time period of the resource
If the Reservation option has been checked in the Resources section of the Imaging facilities tab, the Block time option will be displayed.
Choosing the Block time option creates a marker which does not allow scheduling of any event in that time slot. This marker behaves exactly like a scheduled study. To block a certain time, highlight the time slot and then right-click the mouse to choose the Block time option. New Block Time screen appears as shown below.

The user can choose a specific reason from the drop-down menu for the block time or leave it blank. After the time has been blocked, the scheduler will display the blocked time.

The blocked time slot can be unblocked by right clicking on it and selecting Unblock.
You can blocked a resource for the entire day by All Day Slot. It can be performed by right-clicking the date underneath the resource name and choosing the Block Time option.

The resource will be blocked for the entire day and no studies can be scheduled in the resource for day.
If you wish to block time beyond the time allowed for the resource (for example, to block time before the resource start time), select the configuration entry Allow block beyond resource time. This configuration entry is unchecked by default.
To view details about a recurring Block Time in the RIS Settings - Block Time Entry menu, please refer to the section How Do I Block a Time Entry in the Scheduler?. That option is only available to users with Block Time privileges.
You can view today's schedule by clicking Today or go to a certain date by choosing Go to Date.
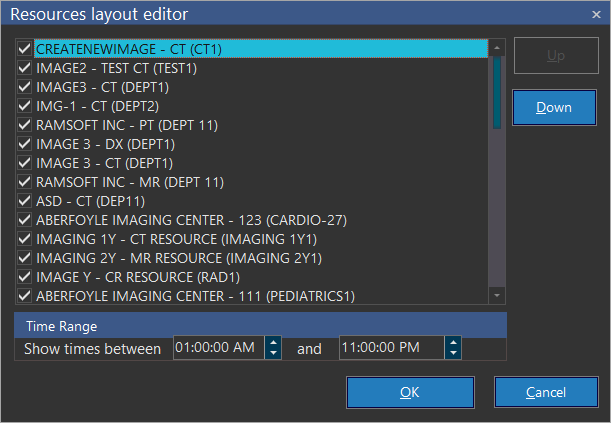
Resource layout editor
The Resource Layout Editor is used to specify the resources displayed. The order of the resource display can also be changed with the Up and Down buttons in the resource edit.
The following five icons at the bottom of the scheduler can be used to change the visual layout of the resources:
| Icon | Name | Description |
|---|---|---|
| First Resource | Scrolls horizontally to the first resource | |
| Last Resource | Scrolls horizontally to the last resource | |
| Show More Resource | Increases the number of resources shown at one time in the scheduler | |
| Show Less Resource | Decreases the number of resources shown at one time in the scheduler | |
| Save Layout | Saves the current resource layout, including modifications in the Resource Layout Editor |
The users will be able to see resources from the facility they are a part of. However, System Wide Administrators and users who are not bound to any particular facility will be able to see resources from all the facilities. The editor has a Time Range section. The user can select the timings of their facility in this section. These will be the timings displayed in the scheduler and studies can be scheduled in those time slots. If the user selects a closing time which is less than or equal to the opening time, an error message is displayed indicating that the end time must be greater than the start time.
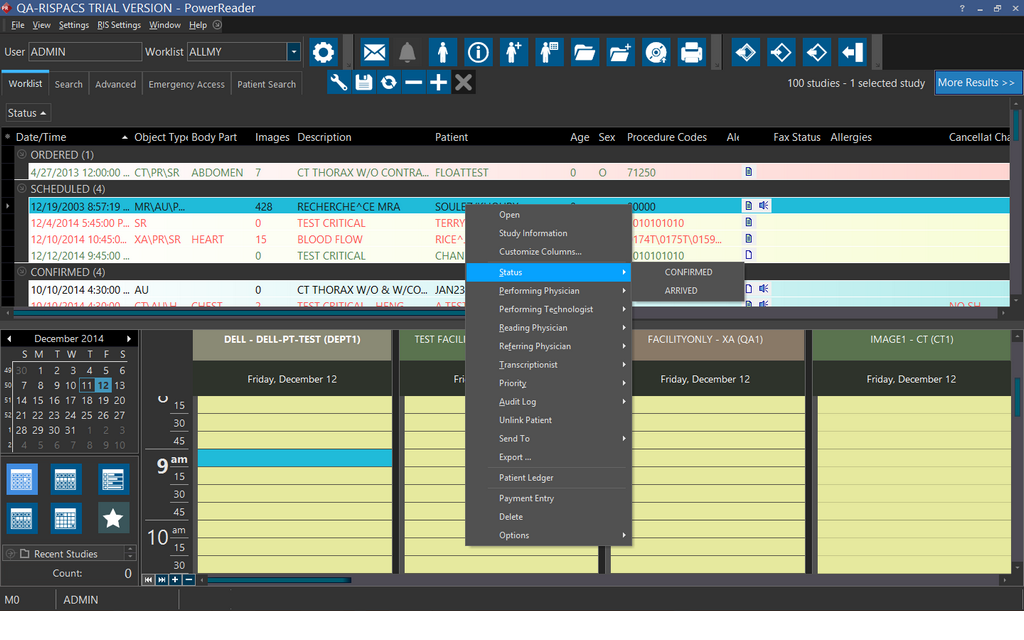
Changing the appointment status of a study
Once a study is booked you can change its duration by clicking, holding and dragging its top or bottom borders. You can also move it around by clicking inside its box, holding and dragging. By right clicking on a study you can do the following things:
- Confirmed – sets the study's status to CONFIRMED
- Arrived – sets the study's status to ARRIVED
- Ready For Scan - sets the study's status to READYFORSCAN
- Need to reschedule – sets the study's status to ORDERED
- Cancelled w/ notice – sets the study's status to CANCELLED and removes the study from the scheduler
- No show – sets the study's status to CANCELLED
The Create appointment.. option will open the New Order form and the study can be ordered.
Right Clicking and choosing the Confirmed, Arrived, Ready For Scan statuses will change the background color of scheduled study to that defined in the worklist.

If the user chooses the Need to reschedule, Canceled w/ notice or No Show as the status, a confirmation box will be displayed.

In the example above, when Need to reschedule option is chosen, a conformation box is displayed. If the user chooses Yes, the study will be assigned ORDERED status.
The various changes to a scheduled study's status can also be performed through the Worklist. To change the status of a scheduled study (i.e. Confirmed, Canceled, etc.), right-click the study in the worklist and choose Status >> desired status for the appointment. The user will be able to choose any status from the Worklist which is available in the Scheduler except "No Show" status. The audit trail will also be updated accordingly. This change of status is also available in study info form. If the user opts to change the study status from the study info form, the form must be closed and reopened for the changes to be visible in the appointment history.