How to Configure Local Settings for PowerReader?
Local Settings are stored on the server to set the behavior of the system. This makes these adjustments accessible by all users from all client stations. The only exception to this are settings that pertain to the behavior of a particular client machine. These settings are stored locally on each machine. They are accessible through the Local Setup menu.
Configuring the basic settings of a PowerReader client
Click Settings > Local Setup. Local Setup screen appears as shown below.
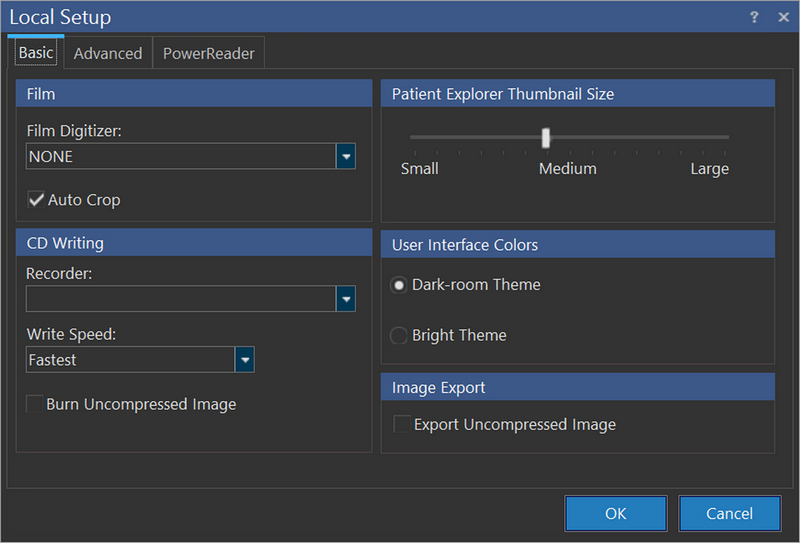
If the workstation is connected to a Film Digitizer, the type of digitizer must be selected.
By default, Auto Crop checkbox is checked. When documents are scanned/films are digitized, the RamSoft software automatically crops the image to remove blank space around the edge of the image.
To DICOM CDs, it is necessary to configure the CD Writing correctly. The Recorder (drive) and Write Speed for CD burning can be selected from the list of detected drives.
If you wish to burn uncompressed image, check Burn Uncompressed Image checkbox. This ensures that archived data can be imported to those systems which do not support data compression.
You can increase or decrease the size of the patient explorer thumbnail by sliding the pointer towards right/left in the Patient Explorer Thumbnail Size.
By default, Dark-room Theme option is selected under User Interface Colors. This applies dark skin to the application. This dark skinned application will match with the background color of the dark-room. You can select either of the themes and restart PowerReader. You can see that the selected theme is applied. When you upgrade the PowerReader client, the last used theme would be retained by default.
If you wish to export uncompressed image, check Export Uncompressed Image checkbox.
Click OK to save the configuration.
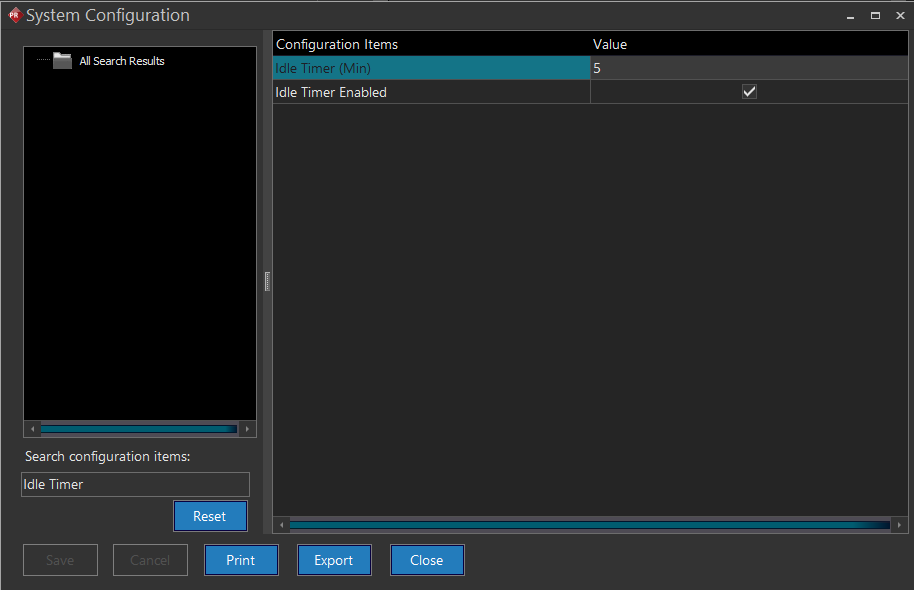
Idle Timer
If the system remains inactive (after the user exits PowerReader) for the time duration set in Idle Timer (Min), then any logged in user is automatically logged out. This prevents unauthorized access to the system.
The Idle Timer duration is set at the system level as system configuration Idle Timer (Min). This time duration applies to all the PowerReader users of the server.
Note: When you set the time duration in the Idle Timer (Min) field under Server Settings > System Configuration, you need to log off from the PowerReader portal and login back to apply the changes. This configuration cannot be applied if the Idle Timer Enabled configuration entry is not selected.
It is recommended that the System Administrator recycle "PowerReaderAppPool" when ever the Idle Timer Enabled configuration entry is enabled/disabled.
The default value for the Idle Timer is 60 minutes. Depending on the location and users accessing the Gateway or PowerReader machine in question, this value should be set accordingly. The maximum idle time you can set up is 720 minutes (12 hours). If a user sets it up to any value higher than 720, it gets automatically set to 720 minutes.
In this example below, the Idle time is set to 5 minutes.
The Idle Timer Enabled and Idle Timer (Min) configuration entries are ignored when the system configuration entry Allow Password to be Cached is enabled.
There may be instances when users would like to cache the password locally, thereby allowing them to not have to login each time they open PowerReader. The Allow Password to be Cached configuration entry (under Settings > System Configuration in PowerReader) when enabled by a system administrator allows a user to log in without re-entering username and password after the first login on a device.
If a device is not used to log in for Password Expiry Days (or)
If the user clicks Logout (or)
If the user clears the Cache, then the user would have to enter the username and password again.
When this configuration entry is enabled, the user would have the Remember username and Password option available on the login portal. The user can select this option on the first login. On subsequent login(s), the user can open PowerReader login portal without having to enter the login credentials since the system now remembers the username and password.
With this option, users must ensure that they explicitly click Logout when using a "public" device. If another user logs in the system, the first user will automatically be logged out. The feature affects the entire login portal. When the system config for cache and password memorizing from browser are enabled, the entire login portal will stay alive (not be logged out).
When the Allow Password to be Cached configuration entry is not enabled, only the Remember Username option is available on the login portal.
Ensure that the Keep Alive Timer (Min) System Configuration entry value is always lower than the value set for Idle Timer (Min). It is recommended that you do not change these values often.
Configuring the advanced settings of a PowerReader client
Click Settings > Local Setup > Advanced. Advanced tab appears as shown below.
The Advanced tab allows the configuration of additional settings.

Default Modality is used when a new study is created with images acquired through a document scanner, film digitizer or importing of a file. Unless the scheduled modality is modified, the default modality will be applied (RG = Radiography).
Save SOP Class determines the DICOM image type used when new images are acquired. The default setting Sec Capture is recommended for most environments. However, this SOP class will not be interpreted correctly if the images need to be sent to many older DICOM devices. In this case, the SOP classes Sec Capture (Old), Ultrasound, or Fluoroscope may be used.
Max Number of Study Desktops determines the total number of study desktops that could be opened at a time.
Click OK to save the configuration.
Configuring the PowerReader specific settings
Click Settings > Local Setup > PowerReader. PowerReader tab appears as shown below.
Note: The PowerReader tab will only appear on PowerReader machines.
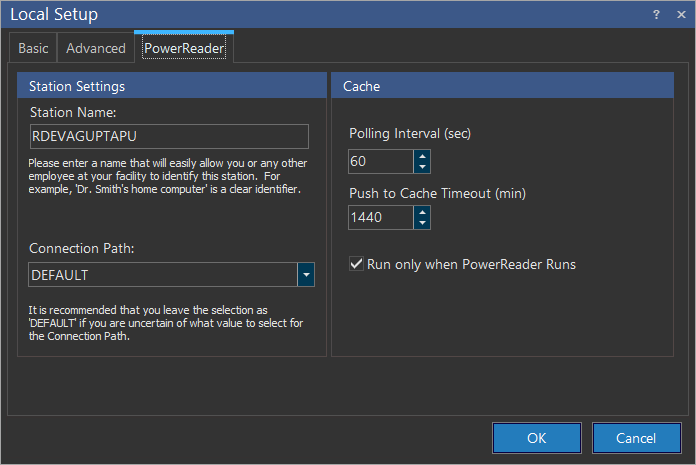
The Station Name field corresponds to the name that the PowerServer user to distinguish this client from the other clients connected to the server. By default, this field is populated by the machine host name. This field is visible to the person attempting to send the study to the PowerReader. If the list of possible machines to send is long, these names need to be very detailed to distinguish between the different PowerReader machines.
The Connection Path drop-down menu, allows the PowerReader to select a path while retrieving images. For more details on Connection Paths, click Cache Distribution section.
Click Connection Path to see the procedure/steps how to create a connection path.
Users can adjust the settings of the Cache. The Polling Interval refers to how often the PowerReader machine will check the server for any studies that are being sent by the server. The default value is 60 seconds and should not be modified under most circumstances. The Run Only When PowerReader Runs feature will prevent the Cache from running when the PowerReader is closed. Push to Cache Timeout (min) option will determine the time when the Cache will timeout after the PowerReader is closed. This will prevent studies from continuously being pushed to the Cache.
Setting up Logo in PowerReader Login portal
You can display your company logo and/or a text message on all PowerReader login screens. You can do this by using the System Configuration entries "Web Logo" and "Web Notice" through Settings > System Configuration in PowerReader. Load the image that you want to display in the Login screen by clicking the Load button and uploading an image.
Note that whenever you change the web notice or the web logo, you need to restart the web service.
Only jpeg images are supported. If an invalid file format is uploaded, the error JPEG error #53 is displayed.