Creating & Editing Personalized Worklists
The Worklist Editor is a powerful tool used to create custom Worklists on an individual user level, as well as at the role level. The editor is accessible by clicking the Worklist Settings ![]() icon found on the study desktop toolbar.
icon found on the study desktop toolbar.
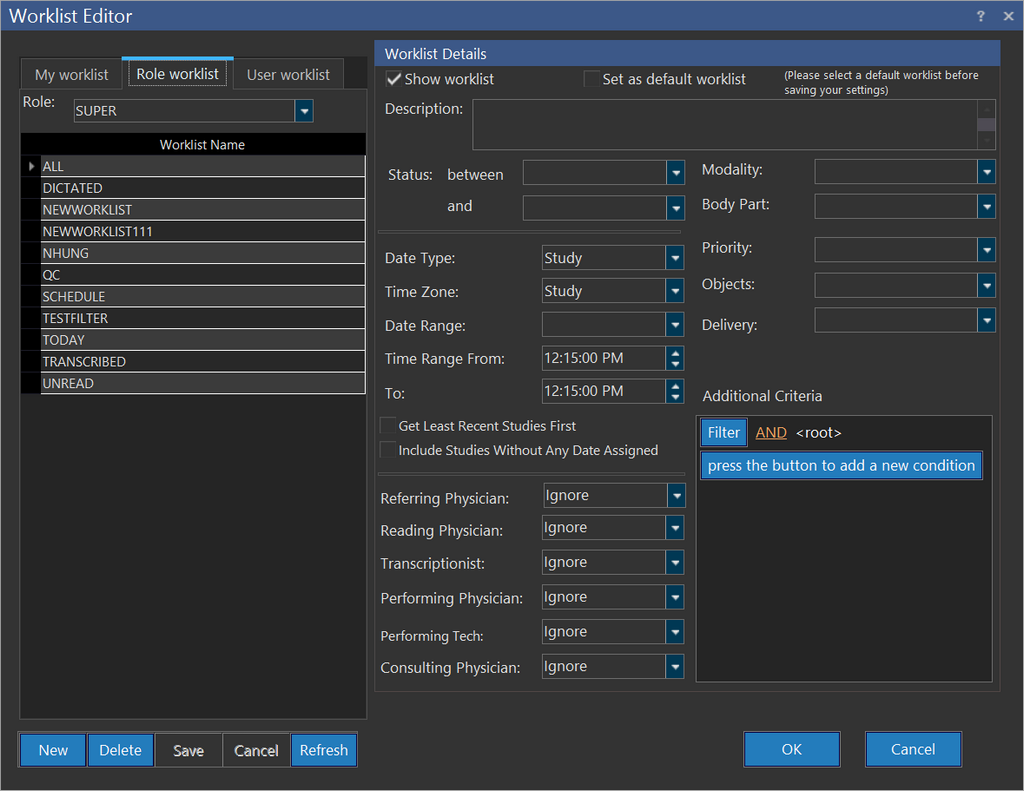
The Worklist Editor contains three levels at which Worklists can be defined. The My Worklist option allows you to configure your own Worklist. The Role Worklist option allows the creation of a Worklist that will be available to all users within a role. The Role dropdown menu determines what role the Worklist will apply to. The User Worklist option allows the configuration of a Worklist for a specific user of the system. The user is chosen from the User dropdown menu.
Note: Only a user with Administrator or System-wide Administrative privilege can access other users' Worklist in the User Worklist tab. The following screen shot displays the Worklist settings as available for a user without administrative privileges:

Under Worklist Details, choosing the Show Worklist allows the Worklist to appear on the screen. The Set as a Default Worklist option when selected, specifies the default Worklist to be used on the first login of a user( a new user) that belongs to a specific role. This option is available for selection in the Role Worklist and User Worklist tabs and is a read only field in the My Worklist tab.
The Set as Default Worklist is enabled for User Worklist and Role Worklist tabs as it can be used either by a user to configure a different user's settings or change the settings for a different role.
Upon subsequent logins the users will see the last Worklist viewed.
To create a new Worklist, click NEW. First choose the level the Worklist will be created at. If it is the Role or User level, choose the desired Role or User from the pull down menu. Next enter a name for the Worklist. If this will be the default Worklist for the target entity, check Set as default Worklist. Next, enter a Worklist Description. This is a reference field that describes the purpose of this Worklist. The Worklist Description contents are only visible on this screen, and are meant solely as a reference for the user.
The following instructions cover all the fields that can used when creating a Worklist.
| Note: None of the fields are mandatory. Any of the fields can be left untouched and they will not be used for the Worklist. |
|---|
Selecting a status for the worklist
The Status Between: and and: options are used to filter studies in the Worklist according to certain statuses. All the studies which have a status between these two limits will be displayed in the Worklist. The Status between: option will display studies which have a status equal to or more than the value defined in this field. The Status and: option will display all the studies which are less than or equal in status to the value defined status.
For example, a Front Desk person might want a Worklist of all studies which are scheduled for today. In this case, they can select a Worklist where the Status between: value is SCHEDULED and the and: value is SIGNED. This particular Worklist will display all studies which have been scheduled for today, where the patients has been scanned, or those studies where the Reading Physicians have viewed the study and signed the Diagnostic Report.
Selecting a date time criteria for the Worklist
The following options are used to create a Worklist with a specific date/ time criteria.

| FIELD | DESCRIPTION |
|---|---|
| Date Type | Choose a Date Type from the drop-down menu. There are three possible values which can be chosen i.e Study, Read and Receive. Users can choose the Study option is for a Worklist according to the study date and time. The study date time is displayed in the Study Info form. The Read option from the drop-down menu is for studies which have been read by the Reading Physician within a certain time period. Selecting the Read option from the drop-down menu displays the studies read by the reading physician in relation to to today's date. For example, the Read option has been selected in the Date Type option along with Last 24 Hours in the Date Range option then, the Worklist will always display the studies which have been read by the Reading Physician within the last twenty four hours. The Receive option will display those studies in the Worklist which have been received by the PowerServer within a certain time period. It short, this option displayed studies received within a certain time period. For example, selecting Receive in the Date Type option along with Last 2 Days in the Date Range will display those studies in the Worklist which have been received within the last two days of today's date. |
| Time Zone | The Time Zone displays the Worklist according to a specific time zone. This drop-down menu has three options i.e. Study, UTC and Local. Study is the time of the creation of the study. It will be the time of the client on which the study was created. While receiving a study from a modality, if the time-zone has not been specified, the RamSoft DICOM service will stamp the time-zone based on the server's time zone. UTC is for displaying studies according to the UTC (Coordinated Universal Time). Local option displays the local time of the PowerReader client on which the study is being viewed. |
| Date Range | Study's Date Range displays studies in the Worklist in relation to today's date. For example Read is selected in the Date Type along with Last 2 Days in the Date Range, the Worklist will always display all studies read by the reading physicians with the last two days. (For a more detailed description of the options available in Date Range, please view the table below). |
| Time Range From | The Time Range From: drop-down menu displays the studies which have been scheduled after the time chosen. See section Time Range Option in Worklist Editor below for further information. |
| To | The To: field is the used to display the studies which have been scheduled before the chosen time. See section Time Range Option in Worklist Editor below or further information. |
| Get Least Recent Studies First | Choosing the Get Least Recent Studies First option allows the oldest studies to be loaded first. Hence, unless specified, all the oldest studies will be displayed on the top of the Worklist. This option prevents the possibility of overlooking any older studies which require further action. |
| Includes Studies Without Any Date Assigned | The Include Studies Without Any Date Assigned option will display those studies in the Worklist which have not been given a scheduled time. This means that the study does not have any value in the Study Date/ Time field of the Study Info form. |
Various options for Date Range
In the Date Range drop-down menu, the following options can be selected.
| FIELD | DESCRIPTION |
|---|---|
| None | When Selected, this option will ignore the Study Date. For example, if Date Type option is set to Study along while the Date Range is blank, studies with any Study Date/ Time will be included in the Worklist. If the Date Type is set to Read, while the Date Range is blank, any studies which have been read by the Reading Physician will be included in the Worklist. If the Date Type is set to Receive, while the Date Range is blank, studies received by the PowerServer at any time will be included in the Worklist. |
| Next 30 Days | When selected, this option will display studies which have have their Study Date/ Time within the next 30 days (in relation to today's date). The option only works when the Date Type drop-down menu is set to Study. |
| Next 7 Days | When selected, this option will display studies which have have their Study Date/ Time within the next 7 days (in relation to today's date). The option only works when the Date Type drop-down menu is set to Study. |
| Next 48 Hours | When selected, this option will display studies which have have their Study Date/ Time within the next 48 hours (in relation to the current time). The option only works when the Date Type drop-down menu is set to Study. |
| Next 24 Hours | When selected, this option will display studies which have have their Study Date/ Time within the next 24 hours (in relation to the current time). This option is different than Tomorrow, as this option is in relation to the current time. For example, if the current date/ time is 01/15/2013, 4:50 PM, the Next 24 Hours option will display all studies which have their Study Date/ Time from 01/15/2013 4:51 PM until 01/16/2013 4.50 PM. This option only works when the Date Type drop-down menu is set to Study. |
| Tomorrow | When selected, this option will display studies which have have their Study Date/ Time set to tomorrow's date (in relation to today's date). This option is different than Next 24 Hours, as this option is in relation to the current date. For example, if today's date is 01/15/2013, 4:50 PM, the tomorrow option will display all studies which have their Study Date/ Time set to 01/16/2013. This option only works when the Date Type drop-down menu is set to Study. |
| Today | When selected, this option will display studies which have have their Study Date/ Time set to today's date. For example, if today's date is 01/15/2013, the Today option will display all studies which have their Study Date/ Time set to 01/15/2013. This option also works when the Date Type drop-down menu is set to Read or Receive. In these cases, it will display those studies which have been Read today by the Reading Physician or Received today by the PowerServer. |
| Yesterday | The Yesterday option will display studies which had their study Date / Time set to yesterday's date (in relation to today's date). This option is different than Last 24 Hours, as this option is in relation to the current date. For example, if today's date is 01/15/2013, the Yesterday option will display all studies which had their Study Date/ Time set to 01/14/2013. This option also works when the Date Type drop-down menu is set to Read or Receive. In these cases, it will display those studies which were Read yesterday by the Reading Physician or Received yesterday by the PowerServer. |
| Last & Next 24 Hours | The Last & Next 24 Hours option will display all studies which had their study Date / Time within the last 24 hours or will be within the next 24 hours (in relation to the current time). For example, if today's date/ time is 01/15/2013, 4:50 PM, the Last & Next 24 Hours option will display all studies which have their Study Date/ Time from 01/14/2013, 4:51 PM until 01/16/2013, 4:49 PM. This option also works when the Date Type drop-down menu is set to Read or Receive. If the Date Type drop-down is set to Read, the system will display all studies read by radiologist within the last 24 hours. If the Date Type drop-down is set to Receive, the system will display all studies which have been received by PowerServer within the last 24 hours. |
| Last 24 Hours | The Last 24 Hours option will display studies which had their study Date / Time within the last 24 hours (in relation to the current time). This option is different than Yesterday, as this option is in relation to the current time. For example, if today's date/ time is 01/15/2013, 4:50 PM, the Last 24 Hours option will display all studies which had their Study Date/ Time from 01/14/2013, 4:51 PM until 01/15/2013, 4:50 PM. This option also works when the Date Type drop-down menu is set to Read or Receive. In these cases, it will display those studies which were Read by the Reading Physician within the last 24 hours or Received by the PowerServer within the last 24 hours. |
| Last 48 Hours | The Last 48 Hours option will display studies which had their study Date / Time within the last 48 hours (in relation to the current time). This option is different than Last Two Days, as this option is in relation to the current time. For example, if today's date/ time is 01/15/2013, 4:50 PM, the Last 48 Hours option will display all studies which had their Study Date/ Time from 01/13/2013, 4:51 PM until 01/15/2013, 4:50 PM. This option also works when the Date Type drop-down menu is set to Read or Receive. In these cases, it will display those studies which were Read by the Reading Physician within the last 48 hours or Received by the PowerServer within the last 48 hours. |
| Last 2 Days | The Last 2 Days option will display studies which had their study Date / Time within the last two days (in relation to today's date). This option is different than Last 48 Hours, as this option is in relation to the current date. For example, if today's date is 01/15/2013, the Last Two Days option will display all studies which had their Study Date/ Time from 01/14/2013 until 01/15/2013. This option also works when the Date Type drop-down menu is set to Read or Receive. In these cases, it will display those studies which were Read by the Reading Physician within the past 2 days or Received by the PowerServer within the past 2 days. |
| Last 3 Days | The 3 Days option will display studies which had their study Date / Time within the last three days (in relation to today's date). For example, if today's date is 01/15/2013, the Last 3 Days option will display all studies which had their Study Date/ Time from 01/13/2013 until 01/15/2013. This option also works when the Date Type drop-down menu is set to Read or Receive. In these cases, it will display those studies which were Read by the Reading Physician within the past 3 days or Received by the PowerServer within the past 3 days. |
| Last 7 Days | The Last 7 Days option will display studies which had their study Date / Time within the last seven days (in relation to today's date). For example, if today's date is 01/15/2013, the Last 7 Days option will display all studies which had their Study Date/ Time from 01/09/2013 until 01/15/2013. This option also works when the Date Type drop-down menu is set to Read or Receive. In these cases, it will display those studies which were Read by the Reading Physician within the past 7 days or Received by the PowerServer within the past 7 days. |
| Last 30 Days | The Last 30 Days option will display studies which had their study Date / Time within the last thirty days (in relation to today's date). For example, if today's date is 01/15/2013, the Last 30 Days option will display all studies which had their Study Date/ Time from 12/16/2012 until 01/15/2013. This option also works when the Date Type drop-down menu is set to Read or Receive. In these cases, it will display those studies which were Read by the Reading Physician within the past 30 days or Received by the PowerServer within the past 30 days. |
| Last 365 Days | The Last 365 Days option will display studies which had their study Date / Time within the last 365 days (in relation to today's date). For example, if today's date is 01/15/2013, the Last 365 Days option will display all studies which had their Study Date/ Time from 01/16/2012 until 01/15/2013. This option also works when the Date Type drop-down menu is set to Read or Receive. In these cases, it will display those studies which were Read by the Reading Physician within the past 365 days or Received by the PowerServer within the past 365 days |
Time Range Option in Worklist Editor
The Time Range From and To filters are used to provide the lower time limit for studies in a Worklist. For example, If today's date is 01/15/2013 and the Date Type option is set to Study, Time Zone is set to Study, Date Range is set to Yesterday; setting the Time Range From option to 8:00 AM will display all studies whose Study Date and Time is 01/14/2013, 8:00 AM or more.
The To: filter is used to provide the maximum time limit for studies in a Worklist. For example, If today's date is 01/15/2013 and the Date Type option is set to Study, Time Zone is set to Study, Date Range is set to Yesterday; setting the To: option to 5:00 PM will display all studies whose Study Date and Time is less than 01/14/2013, 5:00 PM.
The two limits are used as a combination. Taking the example described above, if today's date is 01/15/2013 and the Date Type option is set to Study, Time Zone is set to Study, Date Range is set to Yesterday; setting the Time Range From option to 8:00 AM and To: option to 5:00 PM will display all studies whose Study Date/ Time is from 01/14/2013, 8:00 AM to 01/14/2013, 5:00 PM.
- If the Time Range From: time is LESS than the To: time, the Worklist will display all the studies which are between those two times.
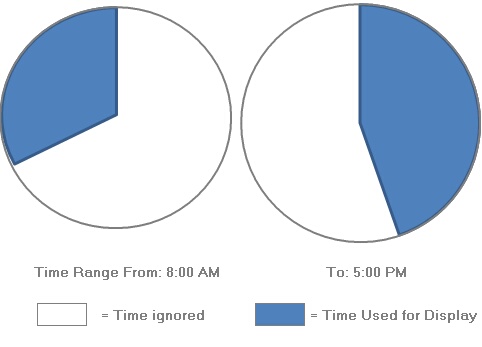
For example, if today's date is 01/15/2013 and the Date Type option is set to Study, Time Zone is set to Study, Date Range is set to Yesterday; the Time Range From option is set to 8:00 AM and the To: option to 5:00 PM, Worklist will display all studies whose Study Date/ Time is from 01/14/2013, 8:00 AM to 01/14/2013, 5:00 PM.
- If the Time Range From: time is MORE than the To: time, the Worklist will exclude all the studies between those two times and display only those studies which are out of that time limit.
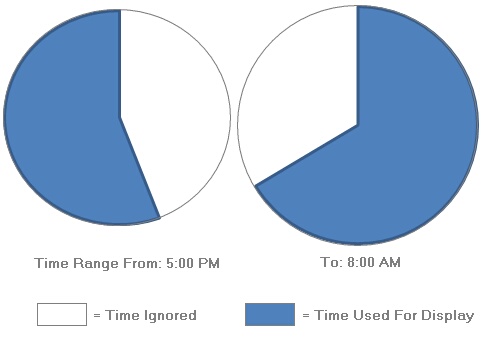
For example, if today's date is 01/15/2013 and the Date Type option is set to Study, Time Zone is set to Study, Date Range is set to Yesterday; the Time Range From: option to 5:00 PM and the To: option to 8:00 AM, Worklist will display all studies whose Study Date/ Time is before 01/14/2013, 8:00 AM or after 01/14/2013, 5:00 PM. Studies between 01/14/2013, 8:00 AM to 01/14/2013; 5:00 PM will be ignored by the Worklist.
- If no specific Date Range has been chosen by the user (i.e. the Date Range value is blank) and a specific Time Range From: and To: time has been selected, the Worklist will display all the studies within that time range while ignoring the Study Date/ Time. In other words, the Date of the Study Date/ Time will be ignored while the Time of Study Date/ Time will be considered for the Worklist.
For example, if today's date is 01/15/2013 and the Date Type option is set to Study, Time Zone is set to Study, Date Range is set to None (i.e. Blank); setting the Time Range From option to 8:00 AM and To: option to 5:00 PM will display all studies (for every day) whose Study Time is between 8:00 AM to 5:00 PM.
| Note: None of the Date/ Time criteria fields are mandatory. Any of the fields can be left untouched and they will not be used for the Worklist. |
|---|
Adding additional criteria for the worklist
The fields Referring Physician, Reading Physician, Transcriptionist, Performing Physician, Performing Technologist and Consulting Physician are set to Ignore by default.

The values that can be inserted into these fields are relative to the user that is logged into the system or assignment criteria. For example, Me will show all studies that contain the currently logged in user as a player, while Not Assigned will only show studies that do not have a user assigned for that role.
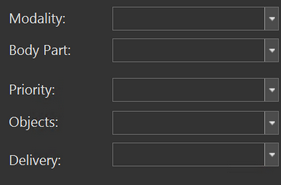
The Modality and Body Part fields may be used to determine the types of studies that the Worklist will display. These drop-down menus allow for the selection of multiple items simultaneously. The Priority field limits the studies of the Worklist on the basis of the priority they have. Choosing a value for Objects will only display studies that contain a desired DICOM object such as an SR Report. The Priority and Objects fields will also allow for the concurrent selection of multiple values. The Delivery drop-down menu will allow the user to filter the Worklist on the basis of the method of delivery used for the studies such as CD, Film, Courier, Fax etc.
The Additional Criteria section allows for advanced creation of Worklist filters. If none of the criteria described up to this point is sufficient to create the desired Worklist, custom filters can be created to do the job. This section is somewhat more involved and is described in detail in the How Do I Create Custom Worklist Filters? section.
Creating filters to exclude specific studies from Worklist
Another option for the Worklist is a Filter which excludes studies with a specific status that have not been accessed in a while. This filter is visible to the System Administrator in the Set up Workflow form and can be accessed through Settings > Server Settings > Workflow.
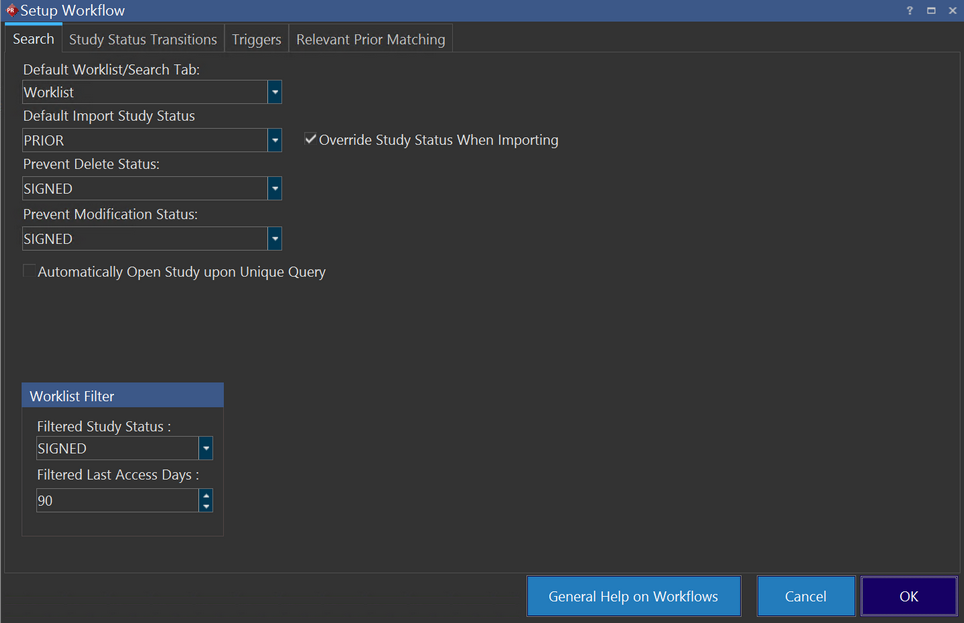
If the Worklist Filter option has been selected, then the studies which have a specific status and have not been accessed for N number of days (e.g. priors that have not been accessed within the past 90 days) will be excluded from the Worklists. This option is enabled by default. Once enabled, this filter will exclude these studies for every Worklist in the system as this filter applies to all Worklists. This option works in conjunction with the options described for creating a personalized Worklist.
When you are reading a study that is the last study on the Worklist and you exit the study by clicking the Finish Reviewing the Study ![]() icon on the Image viewer, the study just before this study is selected in the Worklist and the respective study images if any are displayed in the Image viewer.
icon on the Image viewer, the study just before this study is selected in the Worklist and the respective study images if any are displayed in the Image viewer.
If you are reading a study that is listed anywhere on the Worklist other the last row and you exit the study by clicking the Finish Reviewing the Study ![]() icon on the Image viewer, the study just after the current study is selected in the Worklist and the respective study images if any are displayed in the Image viewer.
icon on the Image viewer, the study just after the current study is selected in the Worklist and the respective study images if any are displayed in the Image viewer.
There are instances when you advance a study by clicking the Go to the Next Study in Worklist ![]() icon , the study is no more part of the Worklist grid. In such cases, if there is a study next to the current selected study and has the same status as the current study, it would be highlighted in the Worklist. If the study you are advancing was the last study in the Worklist, the study prior to the current study would be selected in the Worklist.
icon , the study is no more part of the Worklist grid. In such cases, if there is a study next to the current selected study and has the same status as the current study, it would be highlighted in the Worklist. If the study you are advancing was the last study in the Worklist, the study prior to the current study would be selected in the Worklist.
If you advance a study by clicking the Finish Reviewing the Study ![]() icon and the study is still listed in in the Worklist, then the study is currently highlighted in the Worklist.
icon and the study is still listed in in the Worklist, then the study is currently highlighted in the Worklist.