Messaging
Users can send and receive local messages to and from other users in the system using the Messaging interface. This interface resembles the popular and familiar messaging system, Microsoft Outlook.
Messaging Window
The Messaging screen is launched when you click the ![]() icon on the Worklist toolbar. The left side of the Messaging window is the Folder Pane. It is useful in organizing your messages, referral requests and other message items. Messaging has different default folders such as Inbox, Drafts, Failed Outbox and Deleted Items. Users can have additional custom folders to organize sent or received messages.
icon on the Worklist toolbar. The left side of the Messaging window is the Folder Pane. It is useful in organizing your messages, referral requests and other message items. Messaging has different default folders such as Inbox, Drafts, Failed Outbox and Deleted Items. Users can have additional custom folders to organize sent or received messages.
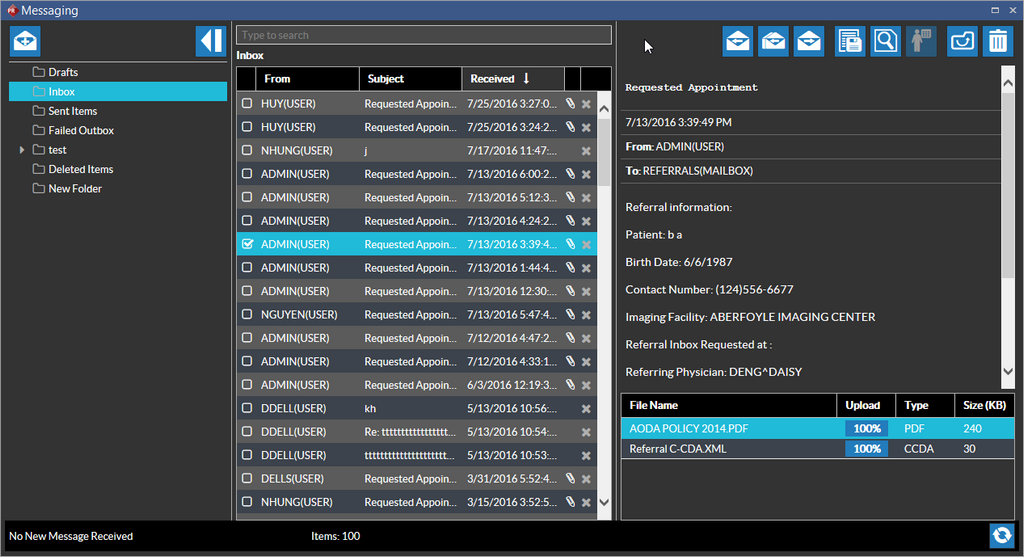
- Inbox: shows the messages received from local users as wells as external sources who have direct addresses. Messages showing the referral requests (waiting to be converted to appointments) sent by Referring Physicians using RapidResults are also listed in the Inbox. At any point of time, the Inbox shows a balloon with the number of un read messages besides the Inbox folder. Direct messages through auto distribution are set to read status by default. For more information on converting an order into an appointment, please refer to the topic Electronic Appointment Requests in RapidResults.
- Drafts: The Drafts folder saves your messages. When you have composed a message and do not want to send it right away, you can move it to the Drafts folder. Note that you can only send one message at a time from the Drafts folder.
- Sent Items: The Sent Items folder stores all the messages that have been already sent including the messages that are in queue before getting verified and sent. The time (in Secs) taken to refresh a Inbox screen to update any new messages received is by default set at 60 Seconds. This can be configured by using the Configuration entry "Direct Message Sync Interval in Seconds" in System Configuration settings.
- Failed Outbox: If a message that that you have sent is not listed in the Sent Items folder, check for the message in the Failed Outbox folder. To re-send failed messages, select the required message or using the Ctrl key select multiple messages and click the Send option on the Messaging tool bar or right click and select the Send option. You cannot move messages from the Failed Outbox folder.
- Deleted Items: This folder shows all the messages you have deleted. If you have deleted a message accidentally and want to move it from this folder, you can select the message in this folder, right-click on the message and select the Move to option to move it to the appropriate folder.
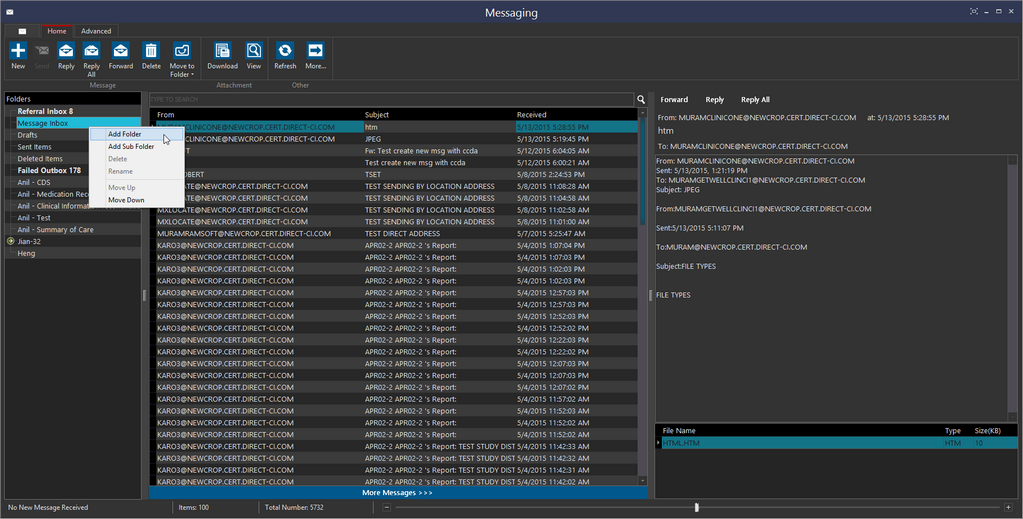
- Custom Folder: You can also create your own folders in the Folder Pane. Folders can be created at the existing folder level or as a sub folder of an existing selected folder as shown in the screenshot below:
Note that Inbox, Draft, Sent Items, Failed Outbox and Deleted Items are default folders. You can move messages from the following default folders: Inbox, Drafts and Sent Items to the Deleted Items folder. You can move messages from the default folders ( Inbox, Drafts, Sent Items and Deleted Items) to custom folders. Moving messages from a custom folder to a default folder is based on the message's status. For example, we can move a received message from Deleted Items folder or a custom folder to Inbox folder.
You cannot add a sub folder to any of the default folders.
Collapsing and Expanding the Inbox folders pane
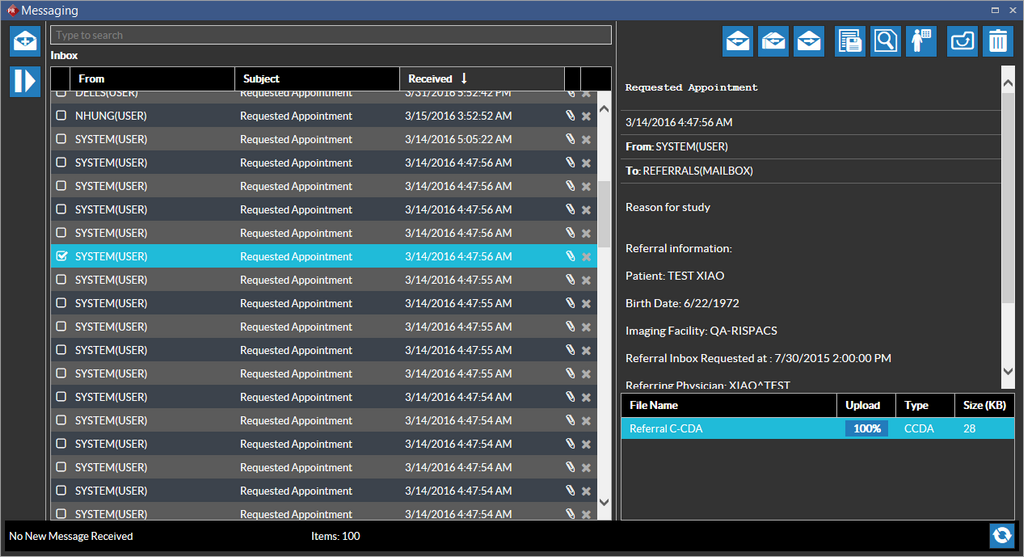
You can collapse or expand the Inbox folder pane. Collapsing the Inbox folder pane expands the Inbox window so that you can view the Inbox information in a maximized view.
The Collapse ![]() button lets you collapse the Inbox folder and the Expand
button lets you collapse the Inbox folder and the Expand ![]() button lets you restore the Inbox folder pane.
button lets you restore the Inbox folder pane.
Messaging Toolbar options
| Icon | Toolbar Option | Description |
|---|---|---|
| New Mail | Click New to compose a new message | |
| Reply | Click Reply to reply to only the sender of the message | |
| Reply All | Clicking Reply All adds all the addresses of the users who received this message | |
| Forward | You can forward an existing message to a different user using this icon. | |
| Download attachment | You can download an attachment using this icon. You can save the attachment to your local machine. | |
| View attachment | You can view a attachment in a new window when you use click on this icon | |
| Convert CCDA to Appointment | Opens the Select Patient dialog and lets you convert the CCDA to an appointment. A user needs to have the "Schedule Appointments" and "Block Time" action privileges enabled for their role in order to convert a CCDA to an appointment. | |
| Delete | You can delete a message by clicking this icon. Once a folder is deleted, only messages under that folder are moved to Deleted items. The folder itself is deleted permanently. | |
| Move To | You can move a message to the following folders: Message Inbox : From a different folder Drafts: When you have composed a message and do not want to send it right away, you can move it to the Drafts folder. Sent Items: You can send any messages that you have sent recently to this folder Delete Items: You can delete a selected message by moving to this folder. |
Creating a New Message
- To create a new message, click the New Email icon
 on the messaging toolbar or press Ctrl +N.
The New Message window appears.
on the messaging toolbar or press Ctrl +N.
The New Message window appears.
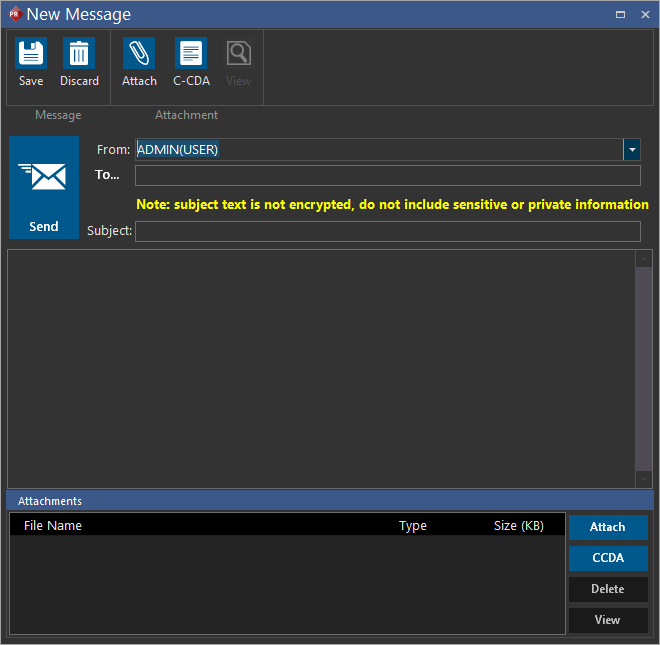
If it is a local message, by default the From field shows the current username. If it is a Direct Message that you are sending, you can select the desired user from the drop-down.
- In the Subject box, type the subject of the message.
- Enter the recipient's address or username (in the case of a local message) in the To box. You can only enter one valid direct address at a time in the To box. If you enter more than one, the system displays the message "Only one direct address allowed". The single maximum length allowed including the domain name for a direct address is 128 characters. You cannot enter a semicolon with a space or a set of users with more than 512 characters in the To field.
- Click Attach
 to add an attachment.
You can also create a CCDA document for a patient on the fly by clicking the CCDA
to add an attachment.
You can also create a CCDA document for a patient on the fly by clicking the CCDA  icon or button. This document gets attached to the message.
 - Click Send
 to send the message.
You can save the message as a Draft by clicking the Save
to send the message.
You can save the message as a Draft by clicking the Save  icon. The message is stored in the Drafts folder. You can delete the message by clicking the Delete icon. You can edit a draft message by clicking on the Edit
  button.
Note:
- You can draft a message without an address mentioned in the To field and even when you have not composed any message.
- When you close a New Message window without sending the message, the message gets saved as a draft automatically.
- When you are trying to save or send a failed or draft message that has already been saved or sent by a different user, a confirmation message "The message has already been sent by someone at sometime. Do you want to make current changes as a new message" displays. Clicking No closes the New message form. Clicking Yes, creates a new message and the message is saved or sent as per the user's choice.
- When you are trying to edit a failed or draft message that has already been updated by a different user, based on the latest status of the message, you can see the hint "The message has already been changed by someone at <time>. Do you want to make current changes as a new message? " when you click the Edit button. When you click Yes, the system saves or sends current message as a new message.
Viewing Messages
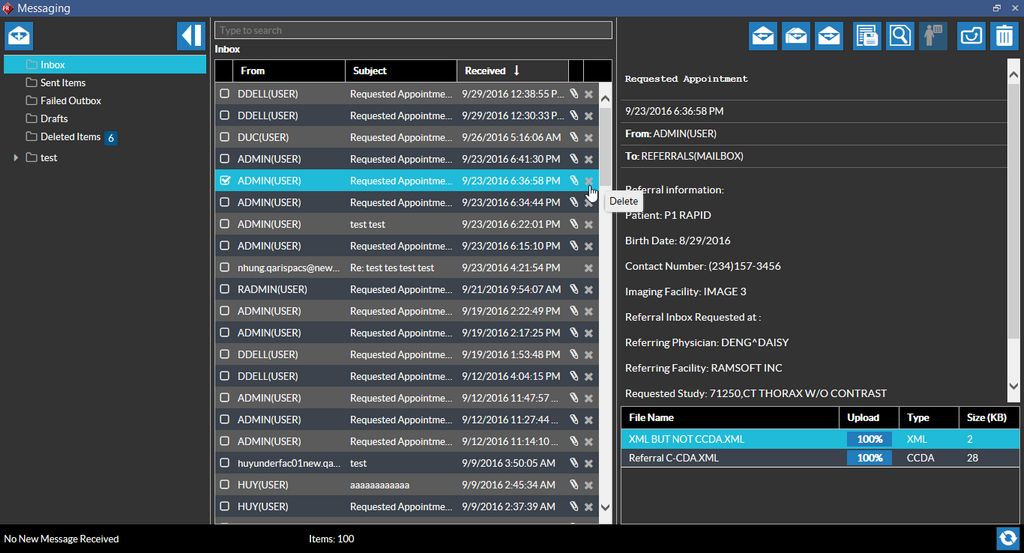
- You can view a message by selecting the message in the Inbox. Selecting the message in the Inbox displays the message in the window next to the Inbox.
- You can click Forward to forward the message to different users.
- You can click Reply or Reply All to reply to the specific sender of the message or to include all the recipients along with the sender.
Deleting Messages
You can delete a message by clicking on the Delete ![]() icon beside any message listed on the Inbox.
icon beside any message listed on the Inbox.
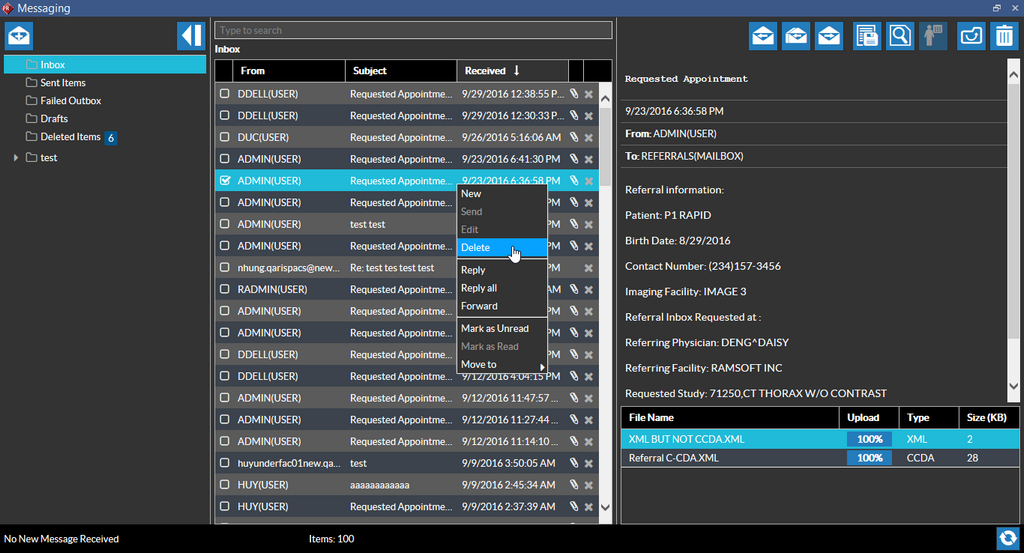
Alternatively, you can delete a message by right-clicking on the selected message and selecting the Delete option from the right-click menu.
You can select multiple messages and click on the Delete ![]() icon (or right-click and select the Delete option ) on any of the messages.
icon (or right-click and select the Delete option ) on any of the messages.
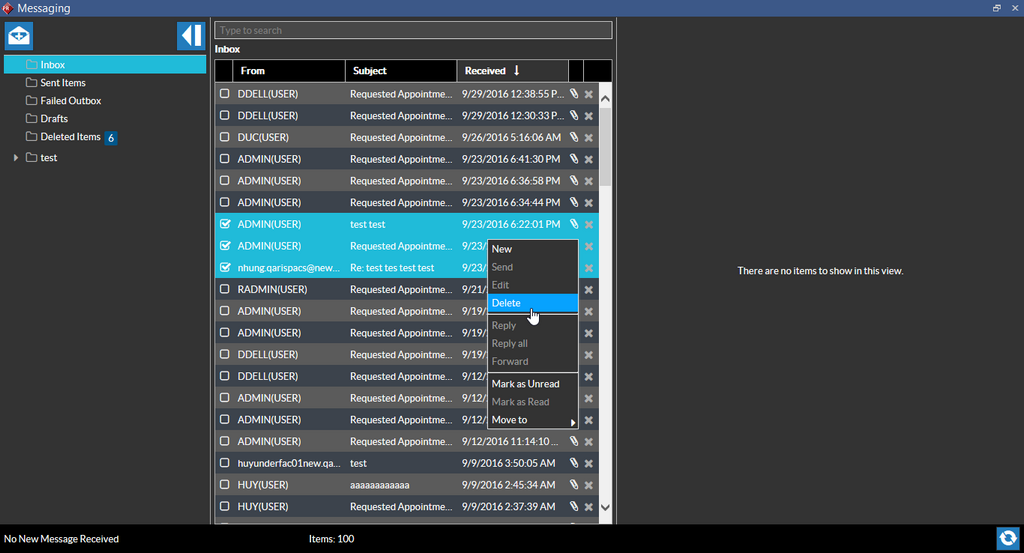
The confirmation message "Do you wish to delete the selected messages?" is displayed. Clicking Yes would delete all the selected messages. Clicking No cancels the deletion.
Attachments
- You can click the Attachment icon to select a file as an attachment.
- Click View
 to display the attachment file's content in a new window.
 - You can delete an Attachment by selecting the attached file and clicking Delete.
- Attachment File name can be up to 250 characters in length.
Message Statuses and what they represent
- Pending: The message is in PowerServer queue and is still not sent to the intended recipient.
- Sending: The message is being sent from PowerServer.
- Sent - Unconfirmed: The message is sent but there is no confirmation received yet. In all probability, the message would have failed. You can see that after some time interval, the message is moved to the Failed Outbox with the notification "601, The remote system has not yet acknowledged receipt of the message...".
- Sent - Confirmed: The message is sent and is acknowledged with a confirmation mail
- Sent Unknown: You see this status when there is no feedback on the message that has been sent. Initially, the status of the message stays as "Sent-Unconfirmed" for 3 days (72 hours) from the date the message is sent before getting changed to the "Sent -Unknown" status.
- Failed: When there is an error sending the message. You will find this message in the Failed Outbox folder.
Local and Direct Messages
-
If you are sending a message by entering a direct address of the receiver, you are sending a direct message. Local messages can be sent by entering a username or the mailbox address the user belongs to. Direct Messages can be sent to users in HealthVault using direct addresses using secure and authenticated protocols.
-
Only users with Meaningful Use License or the Direct Messaging license can use the Direct Messaging feature.
-
Only users with the "Access Messaging" privilege enabled for their Role can read and send messages.
-
The Messaging icon is not displayed if a user has no Messaging privilege and has no referral accessible license. If the user has no message privilege but the product has the referral accessible license, the Messaging form displays only the referral grid and its attachment list grid.
-
The direct and local addresses of the user with no Messaging privilege are not listed in the From address drop-down when composing a message. If a user is part of a mailbox but has no messaging privilege, then the address of the user will not be displayed in the From address drop-down when composing a message.
-
When a message fails to get sent and is parked in the Failed Outbox folder, the message gets resent automatically after a specified time period for a specified number of attempts. This can be configured using the following System Configuration entries:
- Direct Message Resend Interval(h) set to 8 hours by default
- Send Direct Message Max Try Count set to 10 attempts by default