Creating an Imaging Facility
Imaging facility is a physical location where medical imaging is performed. This feature allows you create a new imaging facility and duplicate an existing facility. This imaging facilities tab comprises various sections like Contact Information, Practice type, Fax, Distribution, Facility Details, and Additional Information.
How to create an Imaging Facility
- Click Settings > Users and Facilities > Imaging Facilities tab to create a new imaging facility. Imaging Facility tab appears.
- Click New. This opens a blank form.
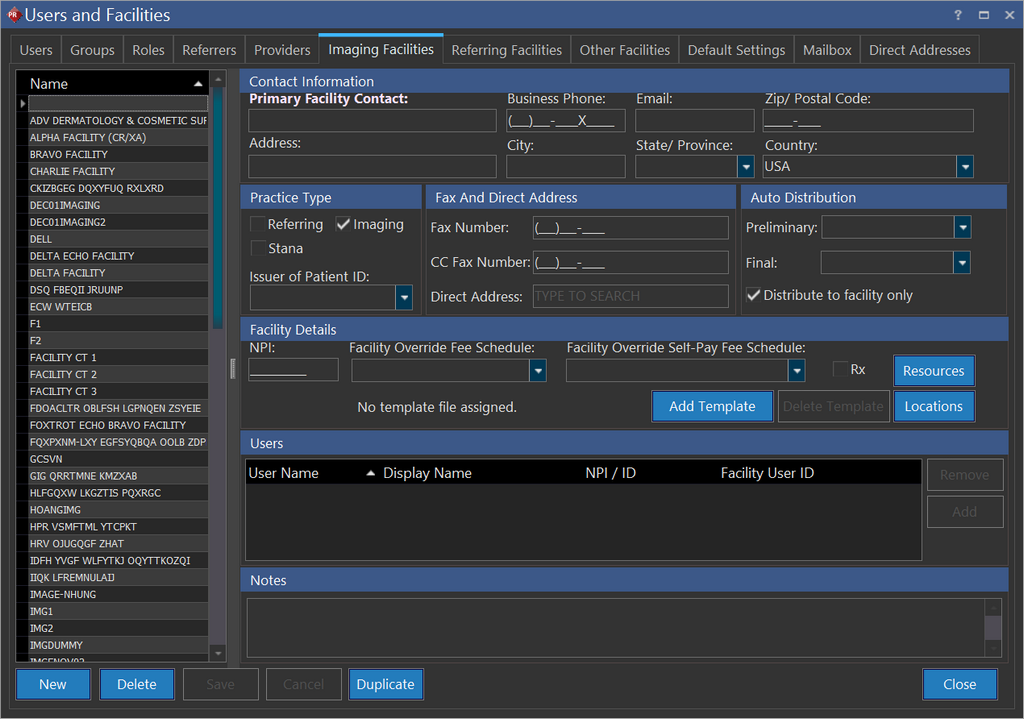
- Type the name of the new imaging facility in the left pane.
Contact Information
- Type the name of the facility in the Primary Facility Contact text field.
- Type other contact information like business phone, email, zip/postal code, address, and city in respective fields.
Prerequisite:
To select a state/province from the State/Province drop-down menu, you will need to select the name of the country from Country drop-down menu.
- Click the Country drop-down menu and select the name of the country. By selecting the country name, the application will automatically fill in the ISD code in the Fax Number and CC Fax Number text fields.
- Click the State/Province drop-down menu and select the name of the state/province.
Practice Type
This sections displays three different types of practices that could be carried out. They are Referring, Imaging and Stana.
Referring
It is a type of practice where patients are referred to an imaging facility.
Imaging
A medical imaging facility is a medical center that conduct studies and provides medical images and diagnostic reports. The types of imaging that may be done include x-ray, ultrasound, MRI, CT scan, nuclear imaging, PET scan, and so on. Basically, a medical imaging center provides one, some, or all types of imaging.

- Click the Issuer of Patient ID drop-down menu to select the name of the facility that issued the patient ID. The issuer of patient ID will be available in the drop-down menu only if the facility name exist in the database of the application else you will need to type in the name of the facility. However, manually typed in issuer of Patient ID will only be related to this imaging facility and it will not be appended to the application database.
You can select an Issuer of Patient ID only from the Imaging Facilities screen under Settings > Users and Facilities. On the Facility Info screen, this field is not enabled.
This Issuer of Patient ID option is closely related to Groups. Please refer to the section Group Overview for further information.
Stana
Stana is a solution for improved patient care and consistency in mammography, patient tracking and Mammography Quality Standards Act (MQSA) reporting.
The Stana module is a reporting and tracking system that incorporates directly into the radiology reporting Workflow.
Select this option to enable the facility with Stana.
Stana is available only if you have the Stana license enabled. For more information on Stana, please refer to the section on RamSoft Stana.
Fax
The Fax Number field must be filled in to use this feature.

- Enter the facsimile number of the facility in the Fax Number text field.
- Enter an alternate facsimile number of the facility in the CC Fax Number text field.
Auto Distribution
Report distribution is available for those with Report Distribution license. The distribution of reports of the study can be automatically forwarded to a facility, Referring physician and Reading physician assigned to that facility. You can automatically distribute reports either by:
- Fax
- Through a Direct message or
- Exporting
A Preliminary report can be auto distributed only when a transition of study occurs.
By using the above listed methods you could choose either preliminary/final report or both reports for distribution. Based on the preferred method(s) you may click the drop-down menu and select accordingly. If the DIRECT, FAX, EMAIL and EXPORT options are left blank, you cannot distribute the reports to the referring facility or referring and reading physicians.
There can be instances when you would want to redistribute (trigger auto distribution) an email or fax a report to an Imaging Facility or referring physician for a certain study if the auto distribution has failed. You can do this by right-clicking on the Final report in the Document Viewer, clicking Send to option and then choosing the relevant option to fax or email the report. Note that here you are redistributing a report which has already been distributed automatically. Hence it is assumed that while you are doing this, you should have the Fax/Email options selected in the Auto Distribution section for the Imaging Facility.
Export is a file export method for diagnostic reports. It allows you chose a preliminary/final report to export in various formats. The exported files are saved in a predefined folder and in a predetermined format in the maintenance module by the system administrator.
Preliminary Report - It is an unsigned intermittent/temporary diagnostic report. In general, these diagnostic reports have less priority than the regular diagnostic reports and are distributed only when final diagnostic reports are not prepared.
Final Report - It is a signed diagnostic report.
By default, Distribute to facility only checkbox is checked. It means that the report is only available to the Imaging facility. If this checkbox is unchecked, the report will be distributed to an Imaging facility, Referring facility and to the referring physicians.
Note that the Distribute to facility only checkbox is enabled only when you have the Report Distribution license enabled. Distributing reports through Direct Messages is not available if MU and Direct licenses are not enabled.

When a consulting physician is added to a study that is signed with a FINAL report, the report will automatically be distributed to that consulting physician.
Facility Details

Add Template
Click this button to add a template specific to the facility that you are creating. Once you click this button, you can upload a report template that can be used by all the users of that Imaging Facility for creating text reports.
Note: You need to upload a template that has a "Body" bookmark. For templates without a "Body" bookmark, the report content will be populated at the top most left corner of the page.
When both Imaging Facility and Global Facility templates are setup, Imaging Facility report template takes higher priority and is used for text reports.
When an Imaging Facility has no template set up for it, the Global Facility template is used by default.
Existing text reports created with a specific template will be based on that particular template even when the Imaging Facility is updated with a new template.
Update Template
Click this button to update an existing template that has been added to the Imaging Facility.
Delete Template
Click this button to delete a global template that has been added to the facility.
Resources
This section allows you to create/modify resources within a facility. Imaging Facility tab has different interface to enter more details about the different modalities and their working hours. A resource can be created only if a department and a room exists already.
Locations
This section allows you to create/modify locations within a facility. Imaging Facilities tab has different interface to enter the locations details like Department, Floor, Type of Location, Room, Phone Number, Fax Number and Auto Fax option.
NPI
Enter the National Provider Identifier number in the NPI text field.
Facility Override Fee Schedule
A manual intervention to modify the fee schedules on a case to case basis is known as facility override fee schedule. Though each and every study has a predefined/definite fee for all types of study that could be performed in the facility, the facility possess the privilege to override the fee schedule. Overriding a fee schedule need not be identical for similar studies. It is entirely on the facilities discretion to override fee schedule on a case to case basis.
Facility Override Self-Pay Fee Schedule
A manual intervention to modify the fee schedules on a case to case basis who are not covered by insurance is known as facility override self-pay fee schedule. It is applicable only to patient who are not covered by insurance. Though each and every study has a predefined/definite fee for all type of studies that could be performed in the facility, the facility has the privilege to override the fee which is to be paid by the patient. Overriding a fee schedule need not be identical for similar studies. It is entirely on the facilities discretion to override fee schedule on a case to case basis.
Rx
This refers to prescription. By default, Rx checkbox is not checked. Allows the physician to prescribe medication for patients, if facility authorizes prescription of medication. This is also useful to indicate the location for the origin of the prescription.
| Department | The department to which this resource belongs | | Room | The room in which this resource belongs | | Type | The type column allows you to select the type of resource. i.e., Modality | | Class | The class is dependent on the type of resource chosen | | Resource | The resource column sets the resource's name. This value cannot be duplicated in further entries |
Create Department
- Click New found on the extreme left if you wish to create a new department. Upon click, the cursor moves to the left pane under Department.
- Type in a name of the department in Department text field.
- Type in which floor the department is located in Floor text field.
- Click Save.
Create Room
- Click the New button at the bottom center of the screen.
- Type in the appropriate data in the remaining fields and click Save.
- Click Close to exit.
Users
This feature allows you to add or remove reading/performing physicians name for the imaging facility.

Notes
The notes section is used to enter any description about the facility.

Duplicating an Existing Imaging Facility
If your business demands to create a new facility which is almost similar to an existing facility, you can make use of this duplicate feature.
How to Duplicate
- Select the name of the facility which is most similar in functionality from the list available on the left pane of Users and facilities screen.
- Click Duplicate. Upon click, the application will create a copy of the chosen facility.
- Do the necessary modifications in the required fields and click on the newly created (duplicated) facility name available in the list.
- Rename it appropriately and click Save.