How Do I Print Images with Windows?
There is an option to print using Windows. This can be used in conjunction with standard inkjet and laser printers, as well as PDF and XPS printers.
To access this feature, go to the study desktop and click on menu arrow beside the Print button. Next, select Windows Print.

The Print Settings form appears.

The ImageFormat section allows the number of Copies to be changed. Rows and Cols refer to the arrangement of the images to be printed.
The Images drop-down menu determines which images are to be printed.
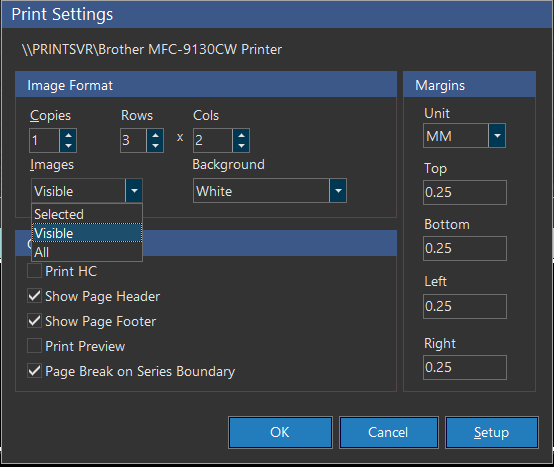
When you print, you have 3 Image options to choose from:
Selected: Only images that have been clicked and highlighted can be printed.
Visible: All the images of a series which is displayed on Viewer box will be printed. If the same series is dragged in two different views, the series would be printed twice. This feature is helpful when you want to print images with different presentation states.
All: Choosing All will print all images inside the study.
The Background drop-down menu gives the choice to print the images with either a White or Black background.
The Margins section allows the user to adjust the space around each page. Each side - Top, Bottom, Left, and Right - can be changed according to the user's preference; the higher the number, the thicker the margin. The Unit drop-down includes millimeters (MM) or Inches.
At the bottom of the settings form are additional options. Print HC enables images of HC modality to be printed. Show Page Header and Show Page Footer enable headers and footers to be shown respectively. Checking Print Preview will allow the user to preview the printed images to ensure they are satisfactory. Finally, Page Break on Series Boundary adds an additional space between different series.
When the Rows and Cols values are set to 1x1 under Image Format, the Orientation setting will be ignored, and the server will determine whether to print in LANDSCAPE or PORTRAIT depending on the image dimensions.
At the top displays the name of the destination. This can be changed by clicking on the Setup button, then selecting a printing destination from the Name drop-down menu.

To change additional settings specific to the printer, click on the Properties button.