Using the Dictation Tool
The Dictation tool ![]() is a voice recognition tool that is used to record audio clips that are associated with a study.
is a voice recognition tool that is used to record audio clips that are associated with a study.
Click the Dictation tool to open the Dictation module. The RamSoft app launcher confirmation message appears. Clicking Yes, displays the Dictation module.
It can be controlled by a Philips SpeechMike, PowerMic and/or a mouse.
Note that the Dictation module is only available as a feature with RapidResults desktop version.
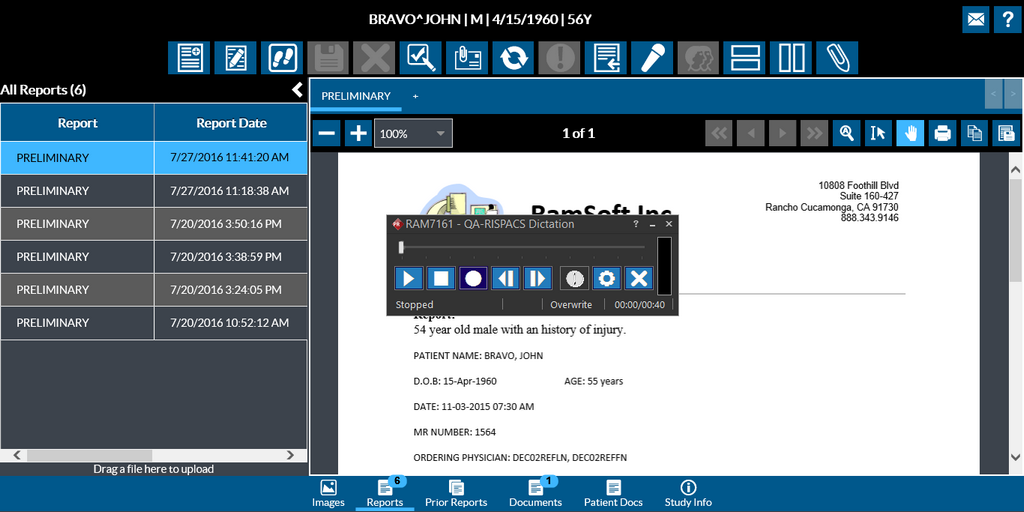
The Dictation Module
The Accession number of the study is visible on the title bar. The Record button will begin recording a dictation. When a dictation is being recorded, the Record button automatically changes into a Pause button and a text in the left bottom corner of the window flashing the word "Recording". A bar on the right displays the Decibel Level for the microphone input. This shows how loud your voice is registering while you are recording the dictation. The minimum level is recording volume threshold. Recording starts only when the acquired volume is greater than the threshold.
To save a dictation, click on the X in the top right corner of the window. This will save and close the Dictation module.
When the Dictation module is open and the current recording has not been saved, clicking the record button will overwrite it. If the current recording has been saved or an unsaved recording is being played, clicking the record button will bring up the following dialog.

The Overwrite option will record on top of the existing recording from the current position.
The Truncate option will overwrite the remaining portion of the dictation if the user clicks on the record button and the "Truncate When Overwriting" option has been selected in the settings. The option appears instead of the Overwrite option in this case.
The Insert option will start recording from the current position, inserting the new recording as it goes but not overwriting the existing one.
The Cancel option will not create a new audio recording and will leave the existing one untouched.
Dictation Module Buttons
Here is a quick list of what each button does in the Dictation Module.
| Icon | Name | Description | Philips Speech Mike Button |
|---|---|---|---|
| Record | Starts and stops recording | Record | |
| Play | Plays and pauses dictations | Play/Stop | |
| Rewind | Moves the dictation backward | Rewind | |
| Fast Forward | Moves the dictation forward | Fast Forward | |
| Stop | Stops playing the dictation | Play/Stop | |
| Critical Study | Makes the priority of the study as "Critical" | N/A - Mouse click only | |
| Settings | Opens the dictation module configuration | N/A - Mouse click only | |
| Cancel | Discards recording and closes the dictation module | N/A - Mouse click only |
Dictation Module Settings
Pressing the Settings button will open the Settings dialog.
The Settings dialog lets you change the way the dictation module behaves while you dictate.
The settings along with their description is listed as follows:
| Field | Description |
|---|---|
| Speaker Volume | Determines the volume of the recording. |
| Microphone Volume | Determines the volume the microphone will record at. This setting is integrated with the Windows Wave In volume. |
| Background Noise Level | The background noise level determines how sensitive it is when listening for this sound and can be used to eliminate background noise while recording. Setting it to Low (Off) will turn all noise filtering off and record any sound the microphone picks up. Setting it to a higher level will prevent noises such as a loud fan from triggering the Voice Activation tool to start or stop recording. |
| Velocity | The speed setting for fast forward/rewind |
| Acceleration | When holding down fast forward/rewind, the speed it increases is controlled by the acceleration. |
| Playback Speed | Controls the speed of the recording. Setting it to Slow will reduce the playback by 50%. Setting it to Fast will increase the playback speed by 50%. |
| Kickback | Makes the play button start playing X seconds before the point in time where the play button is pressed. |
| Foot Pedal | Configures which foot pedal is used to rewind and naturally the remaining pedal is for fast forwarding. |
| Hold Record to Dictate | By default, this option should be unchecked (turned off). Enabling this option allows the user to hold the record button while dictating. |
| Playback while fast forwarding or rewinding | With this option, you could hear the playback in fast motion while the dictation is re-winded or fast-forwarded. |
| Truncate When Overwriting | When the option is checked and the user clicks on the record button, the remaining portion of the dictation is overwritten by the new dictation. |
| Enable Audio Beep Tones When Recording | Plays a beep tone whenever the recording is started, paused, and stopped. |