Template Manager
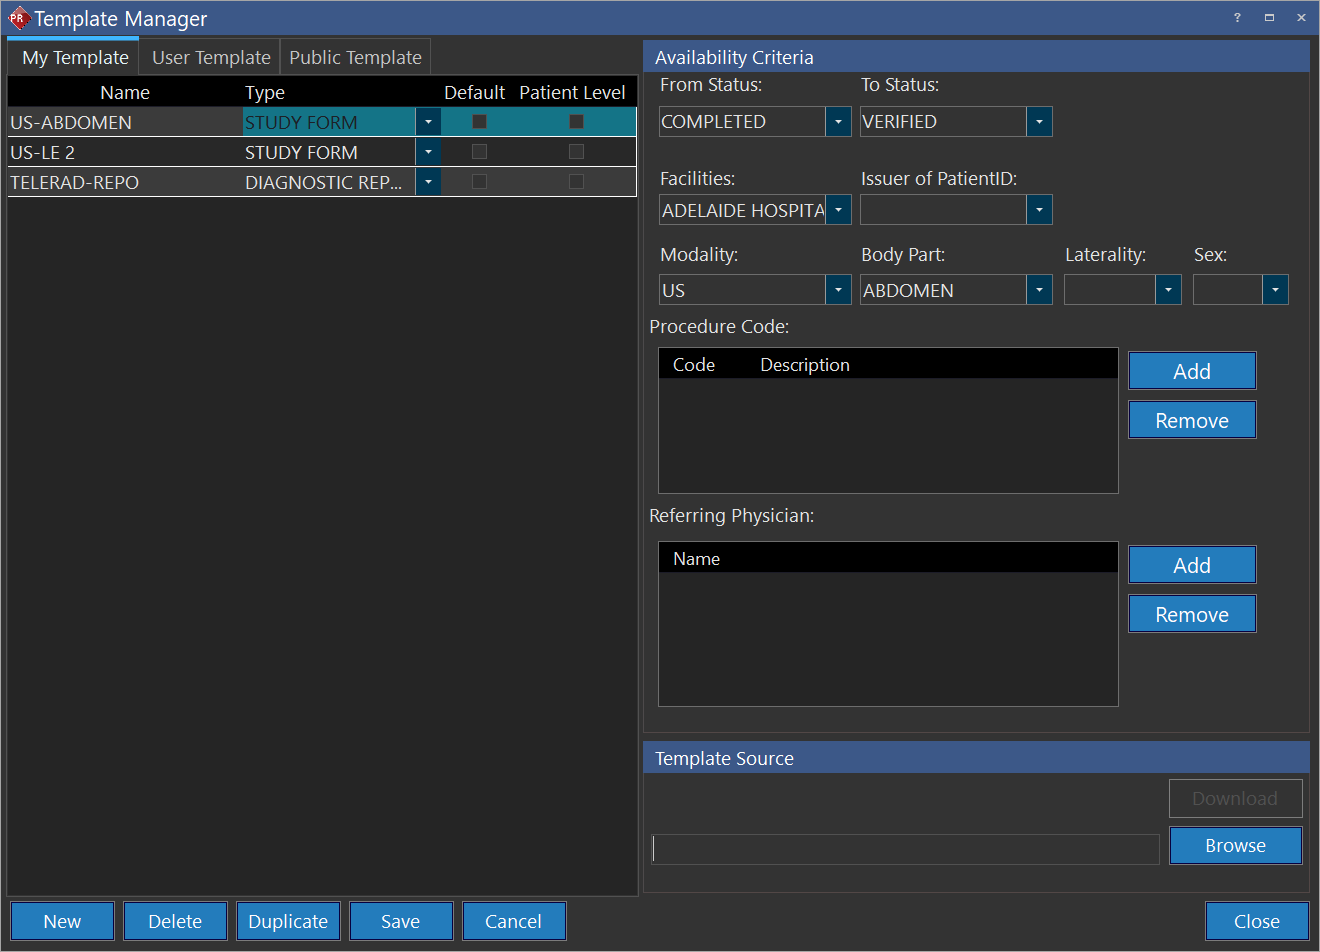
The Template Manager allows report templates to be stored and filtered by certain Users*, Facilities, Study Statuses, Modality, Procedure Codes, and Body Parts. Report templates can be stored and edited by clicking Settings > Template Manager. Template Manager screen appears as shown below. Please note that from PRU10 the window size for the template manager could be changed.
* Users with PACS-LITE and Gateway licenses do not have access to the Template Manager
Templates stored in the My Template section allow only the current user logged into the PowerReader to see the templates. Other users are not privileged to see the templates in the My Template tab.
To add a new template, click New. Choose a name for the template and choose a document type for the template. PowerReader provides the option to create various types of documents i.e. Admin, Clinical, Diagnostic Report etc. Some of these documents are available at patient level as well. Thus, facilities can have Patient Data stored not only at the study level but at the patient level where they can view patient registration forms, insurance cards etc.
A Patient Level column is visible. For the documents which can be viewed at patient level, the column will be checked automatically. The column will be unchecked at documents available at study level. A document can be viewed at either study level or patient level but not both.
The following document types are available at the patient level: HIPAA Consent Form, Insurance Card, Medical records release Form, Patient Forms, Patient Insurance Cards and Patient Registration Form.
The document types available at study level are: Admin, Clinical, Diagnostic Preliminary, Diagnostic Report, Instruction, Labs, Mammo, Referral, RIS, Rx, Screening, and Study Form.
The Default column contains a check mark. It can be checked when the user wishes to define a particular template as the default template.
Filtering is performed based on the fields in the Availability Criteria section of the screen. Only studies which match the template's criteria will allow that template to be used. In this example, the report template in the Template Manager can only be seen by the current user when the study is between the Ordered and Exam Completed study status. The study has to be assigned to the Facilities named Radiology, and the Issuer of Patient ID: has to be RAMSOFT. Modality is MG with Breast as the Body Part. The Sex can only be female in this case and the Procedure Code must be the one specified. The Referring Physician has to be ANDREWS^JULIA.

The File Name can have a maximum length of sixty four characters. If the user wishes to download an existing template, they can do so by choosing a template and pressing the Download button. The Browse button is used to add a new template or to replace an existing template. If a template already exists and the user presses the Browse button, a message appears confirming if the user wishes to replace the existing template.
Click Yes and choose a new template to replace the existing template.
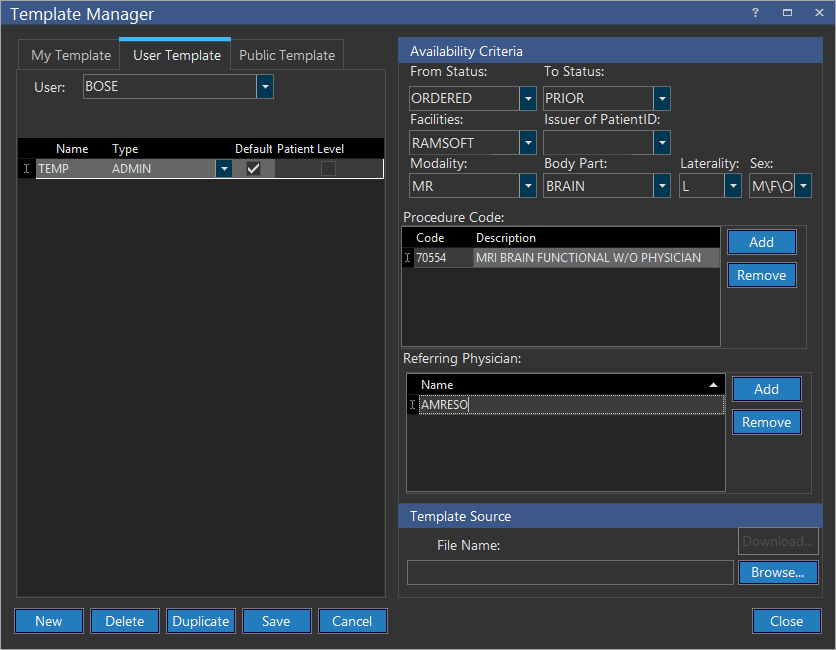
The User Template and Public Template tabs will be displayed in the Template Manager screen, only if the Access Public Templates and Access User Templates checkboxes are checked respectively under Settings > Users and Facilities > Roles > Action tab. To create or delete templates, you should have the Administrator privilege enabled under Settings > Users and Facilities > Roles > User Type tab.
The User Template tab allows the current user to see templates of other users in the system. Without proper access privileges, the user cannot edit any details in other user's template.
Templates stored in the Public Template section can be viewed by any user. Users can also add new public templates by clicking the New button and defining the required parameters. The Facilities drop-down menu will include all the facilities and the user should choose the facility. If a facility is not chosen, the templates loaded in the list will be those that do not belong to any facility. The Roles drop-down menu can be used to select the roles for which the templates are desired. If no role is chosen, the templates loaded in the list will be those that do not belong to any particular role. The Issuer of PatientID drop-down menu is used to select a particular issuer. When the New button is pressed, the Facilities drop-down menu and the Roles drop-down menu under the Availability Criteria will be automatically populated with the current selection in the Public Template section.
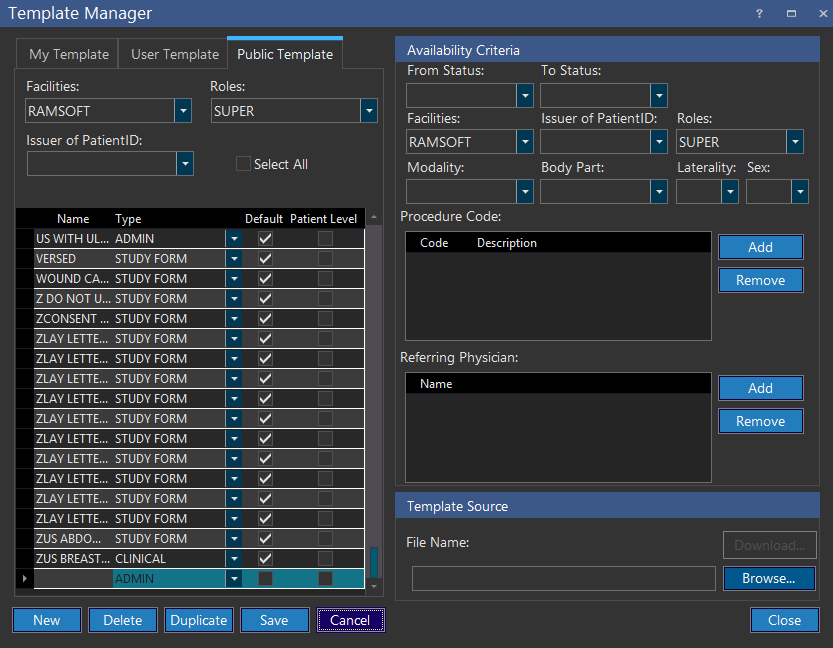
Different Facilities are allowed to have public templates with the same name. As a result, certain rules are applied when two public templates have an identical name:
- If two public templates have no facility or Role defined for them, it is not allowed.
- If both the templates have no facility defined for them and only one has a role defined for it, they will not be allowed.
- If neither of the templates have any facility or role defined for them, they will be not be allowed.
- If neither of the two templates have a role defined for them and one template has a facility defined for it while the other does not, they will not be allowed.
- If neither of the two facilities have a role defined for them and they belong to different facilities, they will be allowed as duplicates.
- If both the templates belong to the same facility but have different roles defined for them, they will be allowed as duplicates.
- If both the templates belong to the same facility and role, they will not be allowed.
- If both the public templates have the same role defined for them but belong to a different facility, they will be allowed as duplicates.
- If both the templates belong to the different facilities and have different roles defined for them, they will be allowed as duplicates.
If for any reason the public templates with identical criteria are not allowed, a message will appear indicating that the newly created template's name is in conflict with an existing template. The user will then be asked to change the name.