Advanced Receive Settings
On the Receive tab of the Station List form, you will be able to configure options that are used by the RamSoft station when it is receiving studies from a remote destination. Any settings you configure will apply only to studies received from the station that is currently highlighted in the list.
- Click Settings > Server Settings > Station List. Station List screen appears as shown below.
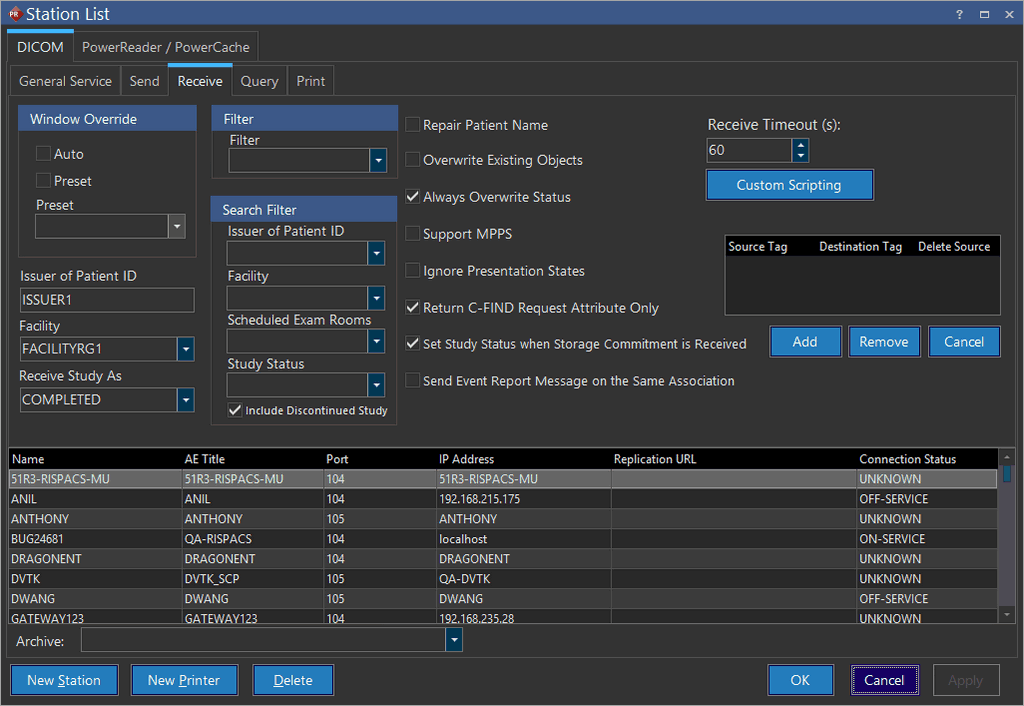
- Click Receive tab. The Receive tab screen appears as shown below.
Receive Tab
| Field Name | Description |
|---|---|
| Issuer of Patient ID | When receiving DICOM data from facilities using different RIS/HIS numbering systems, it is important to segregate Patient IDs from the two facilities. In this situation, it is likely that the same Patient ID is used to represent different patients in the two facilities. Entering a value for the Issuer of Patient ID field, will result in DICOM objects that have the Issuer of Patient ID field blank or null to be populated with this value. The default value for the Issuer of Patient ID (if not set specifically for this station) can be specified in Maintenance. Since this is part of the primary key field in the patient table, this patient will not be merged with a patient with the same Patient ID received from a different facility. |
| Facility | The Facility drop-down menu will contain a short list of facilities the user belongs to. If the user is associated to more than one facility, they will be included in the drop-down menu. If the user is not associated with any facility, all the facilities will be available. If the facility drop-down menu is filtered, it becomes a mandatory field. |
| Receive Study As | The Receive Study As option determines what status will be assigned to the received studies. The default value is COMPLETED, but can be changed to any other status that will better accommodate the system's Workflow. This works in conjunction with the Always Overwrite Status option. Refer the section Status Determination After DICOM Receive . |
| Filter | The Filter drop-down menu can be used to remove/cleanup certain lines, noise etc. If the window/level values cannot be used to clean up certain images, filters can be applied based on the requirement. For example, a smoothing filter may be applied to remove grid lines from a CR device, while a minimum filter may be applied to remove noise from an RF device. |
| Search Filter | The Search Filter section is used to filter remote Worklist search results. This is based on the values set in the different fields available in this section. Various filters can be used to narrow down the search: • Issuer of Patient ID: Includes a list of issuers of Patient IDs known in the database. • Facility: Includes all of the facilities the user is a member of. • Scheduled Exam Rooms: Includes the rooms from that particular facility's Locations form (RIS only). For non-RIS systems, the list of scheduled exam rooms is based on the studies in the database. To set up a new room, a study should be scheduled for the new room in the RIS/HIS and sent to the RamSoft software via HL7. • Study Status: Includes a list of various of statuses based on the situation of the study. • Include Discontinued Study checkbox: When checked, allows studies with study status DISCONTINUED to appear within the search results. Filling in the Study Status field will override this setting. For example, if the workstation is set to only search studies with an issuer value of RAMSOFT and a study status of VERIFIED, those values should be selected from the drop-down menus. Only studies which have these values will be shown in the query results. Note: If the selected station has been configured for replication, this section will be disabled (grayed out). |
| Repair Patient Name | The Repair Patient Name option will check all incoming patient names to see if they contain carets (^). If they are missing, they will automatically be placed into the name. This helps in reducing conflicts and matching up priors with existing patients. |
| Overwrite Existing Objects | The Overwrite Existing Objects option will replace all objects when receiving objects from the station. |
| Always Overwrite Status | Selecting the option to Always Overwrite Status will cause all incoming studies to have the status selected in the Receive Study As field no matter what their previous status was. Works in conjunction with the Receive Study As option. Refer the section Status Determination After DICOM Receive . |
| Support MPPS | MPPS is a method that allows stations to receive the most up-to-date status of the study. It also enables the modality to send a report about a performed examination including dates about the images acquired, beginning time, end time, duration of study, etc. The MPPS service allows a modality to better coordinate with image storage servers by giving the server a list of objects to send before or while actually sending these objects. By selecting the Support MPPS option, MPPS can be received from the sending station. |
| Ignore Presentation States | The Ignore Presentation States when checked off will prevent the receiving station from receiving Presentation States. |
| Return C-FIND Request Attributes Only | The Return C-FIND Request Attributes Only option is checked to receive a C-FIND request. This option is checked by default. When the C-Find request is received, the system also receives a list of dataset on the requested datasets. The systems responds by returning the C-FIND result and filling only the data which has been requested in the list. No other data type is sent with the result. |
| Set Study Status when Storage Commitment is Received | Storage Commitment tells the sending station what the receiving status of the studies on the receiving station is. By selecting Set Study Status when Storage Commitment is Received, study status will change from IN PROGRESS to the actual receive study status in the receiver station before the Storage Commitment has finished sending to the sender station. |
| Send Event Report Message On The Same Association | When the Send Event Report Message On The Same Association is checked off, the receiving station will send a report about the receiving progress to the sending station. |
| Receive Timeout | The Receive Timeout is in seconds and can be selected from the drop-down menu. The Receive Timeout starts timing when the last object of the study has been received. After the last object has been received, the study status will change from IN PROGRESS to the actual receive study status after the Receive Timeout time. |
| Source Tag Destination Tag Delete Source | Field mapping allows individual DICOM tags to be copied, moved or deleted when DICOM objects are received from a specific station. Typically, this feature is used to correct images from modalities that are missing or incorrectly populating crucial DICOM tags. You should view the DICOM header of images received from the device that needs to be mapped prior to performing field mapping. As an example, the above entry copies the StudyID tag (0020,0010) to the AccessionNumber (0008,0050) tag. Refer to the DICOM standard for a listing of all currently approved tags. Check the Delete Source tag to remove the Source tag after completing the mapping. This essentially performs a move operation instead of a copy operation. Set the Destination value to 00000000 and check the Delete Source tag to remove the Source tag without performing any mapping. |
| Window Override | If images received from a specific station do not appear very clear and you need to adjust the window/level values to view them. The Window Override section can be used to automate this process. The Auto window/level, or a Preset can be automatically applied to all images that come in from the station. The Auto option will automatically determine an appropriate window center and window width based on the image histogram for all images received from the selected station. The Preset option will automatically apply the selected window/level preset to all images. |
| Archive | It allows you to select the name of the station list to be archived. |
For information on the Custom Scripting button, please see the Custom Scripting section of the manual.
The Station List (receive tab) screen displays a list of all station names, its parameter such as AE Titles, Port numbers, IP Addresses, Replication URLs, and its Connection Statuses at the bottom of the screen.
- Do the necessary modifications in the fields explained above as per the requirement and click OK.
Field Mapping Example
The RamSoft software relies on the Body Part tag for tasks such as configuring the viewing protocols. However, some modalities do not populate this tag, severely reducing the capabilities of the RamSoft software viewing protocols. In most cases, these modalities do place the body part information in another tag. In such cases, the field mapping function can be used to automatically move the data into the proper tags. For example, some modalities will place the body part information inside the Study Description tag. Before field mapping can be done, a DICOM tag dictionary is needed. One can be found in the DICOM Dictionary chapter of the Service Manual.
After referring to the dictionary it can be seen that the Study Description tag has the value of (0008,1030), while the Body Part tag has a value of (0018,0015).
The following screen shot illustrates how this mapping should be entered into the software for the problematic modality.
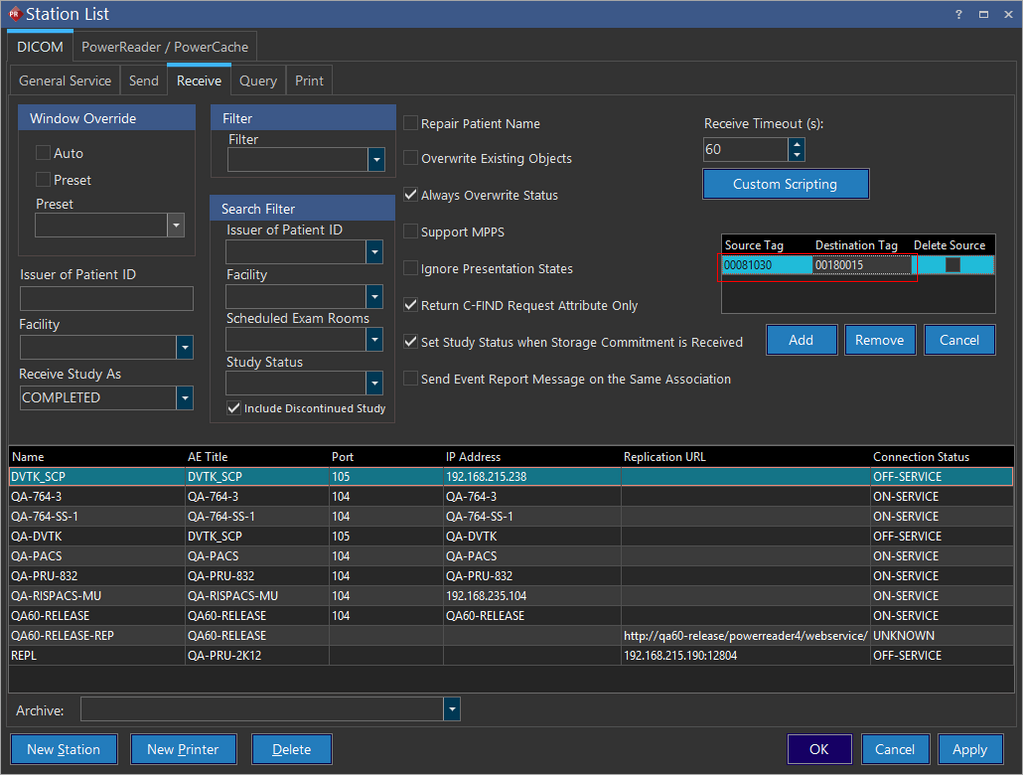
As shown above, the commas and the brackets are not entered. The interface simply accepts the eight-digit numeric sequence for each tag. Since the Study Description tag is not causing any problems, the Delete Source box is not ticked, allowing the Study Description field to remain populated.
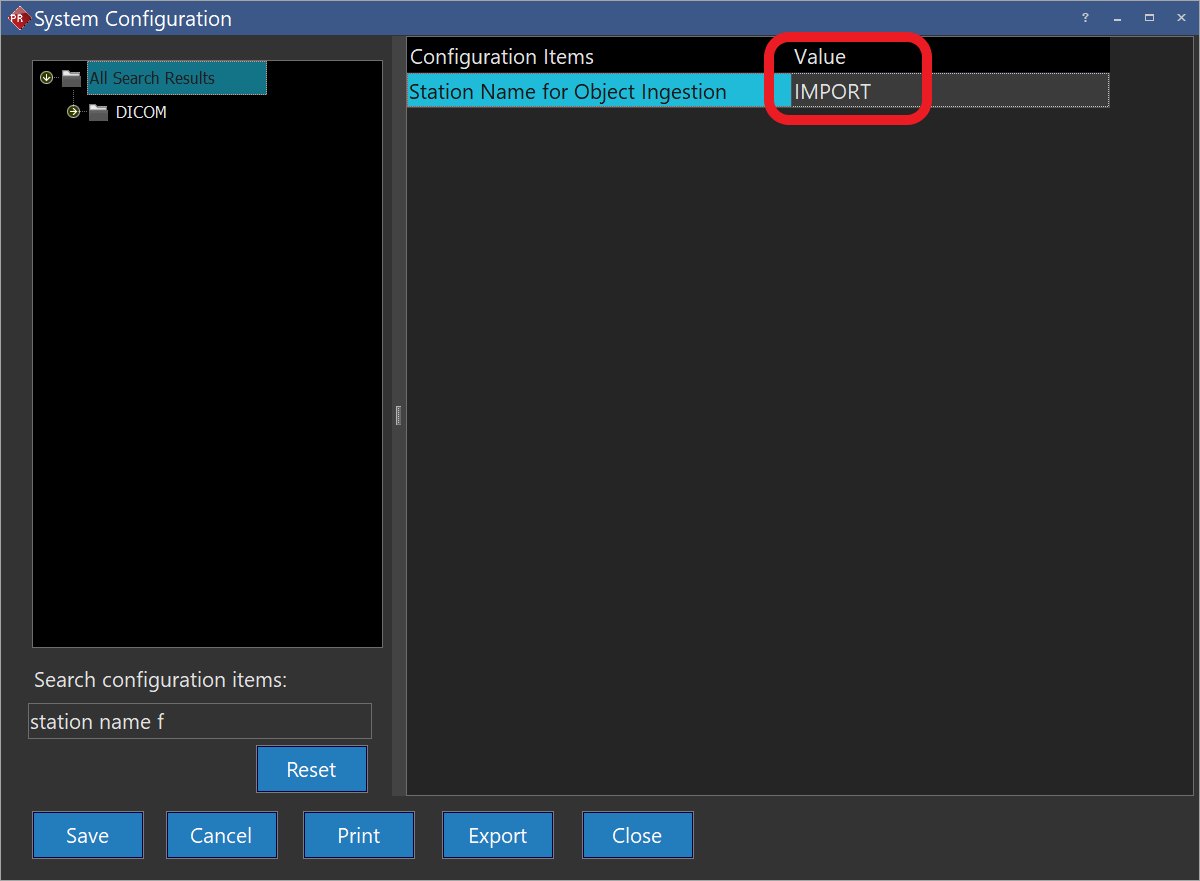
Applying Advanced Receive Settings to DICOM Imports
From PRU10 it is possible to apply advanced receive settings that were described above to any DICOM object that is imported into the system (to learn more about importing: How to Import DICOM Files?). To do that follow these steps:
- In the System Configuration screen search for "Station Name for Object Ingestion" and enter a station name that is not used for other stations in your system.
- Go to the station list and create a new station (Adding New DICOM Station) using the name you entered in the last step. Station type should be DICOM, and other fields such as IP, port, and AE title are not important so fill them with dummy data. Make sure that receive service is enabled for the newly created station:
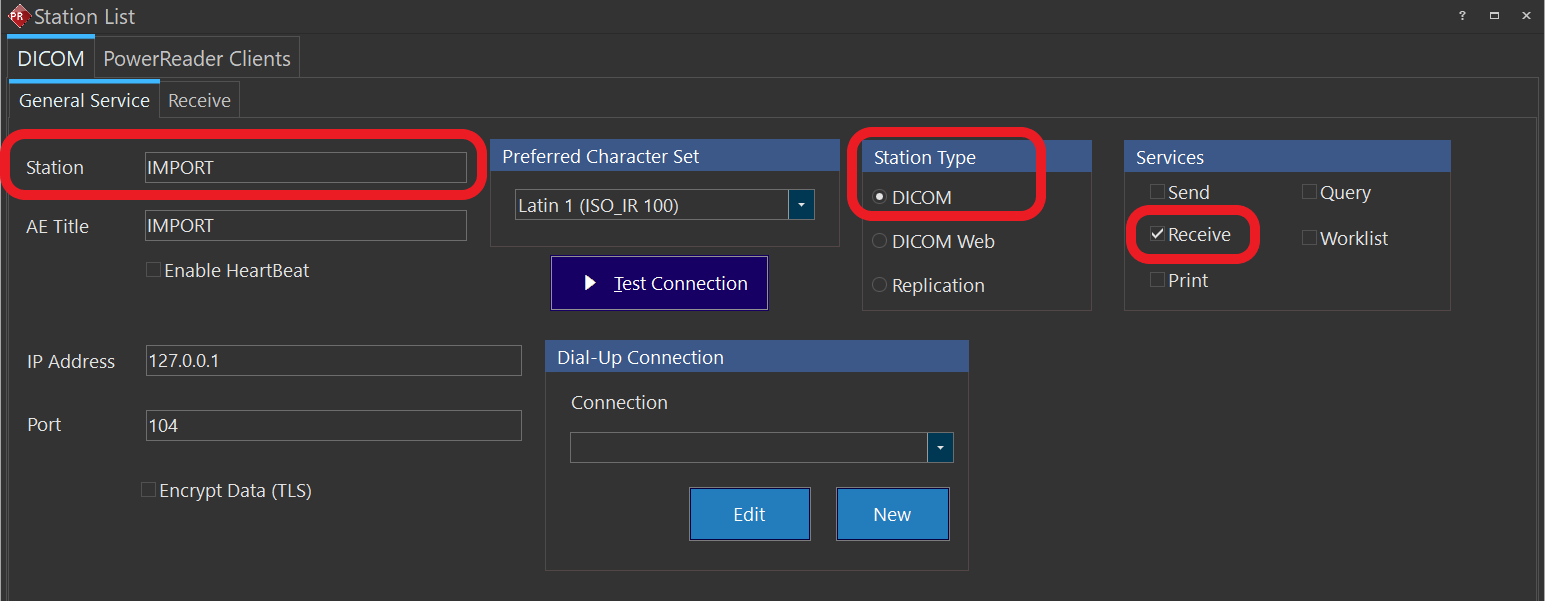
- Now you can use the Receive tab to apply the Advanced Receive Settings that you want to be applied to newly imported DICOM files.
Related Topics:
- Advanced Send Settings
- Advanced Print Settings
- Advanced Query Settings
- Adding New DICOM Station
- How Can I Monitor the Study Requests made to other Stations?
- How Can I Monitor the Studies Received by the System?
- How Can I Monitor any DICOM Communication Problems?
- How Do I Set Up the DICOM Communication / Import Negotiation?