How Do I Configure Prefetching of Priors?
To set up Prefetching of Priors, open the Relevant Prior Prefetching form. This form is accessible by going to Settings > Server Settings > Workflow > Relevant Prior Matching tab.
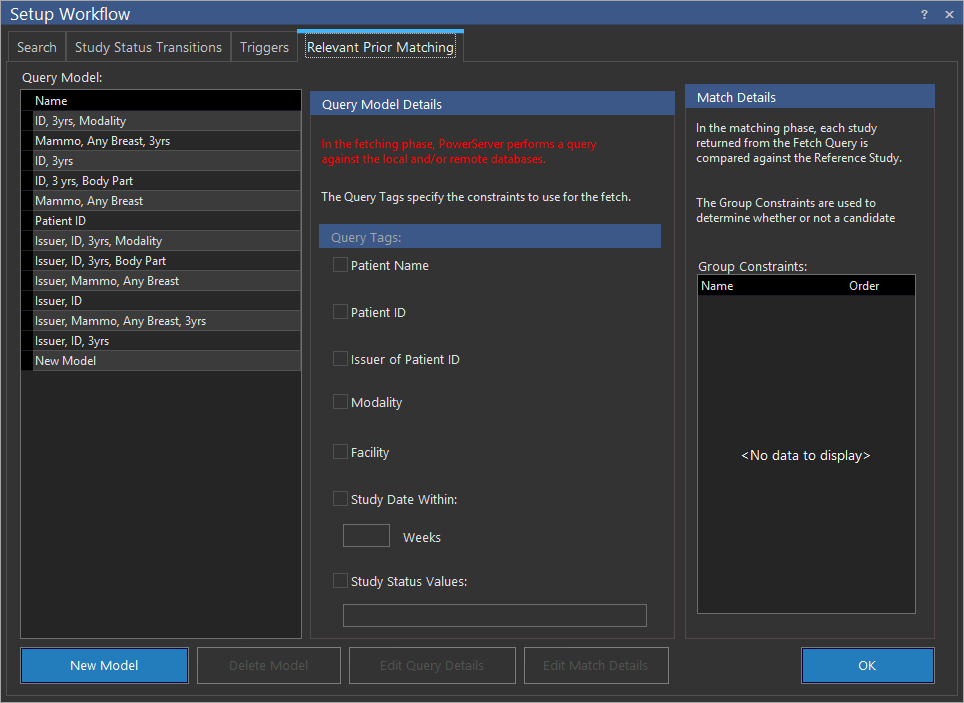
The first thing that needs to be created is a Query Model. To do this, click New Model. This will open up the Define Query Model dialog.

The Query Model is used to retrieve studies to the server during the fetching stage.
First, enter a Query Model Name. This should be something that can easily identify what constraints this query model uses. Next, check any of the Patient Name, Patient ID, Modality, or Facility boxes. Any boxes that are enabled will become constraints, meaning that only studies that have the same value for those fields as the reference study will be fetched to the server. If the query model should only retrieve studies done within a specific time frame, check the Study Date Within box and select the number of weeks to cover. Finally, if the search should only retrieve studies that are in a certain status, check the Study Status Values box and enter the desired study statuses. Multiple statuses should be separated by a / (for example, COMPLETED/VERIFIED).
Once all the necessary settings have been configured, click OK to close the dialog.
Note: The query tags that were configured will now be checked. The Query Model Details form can be changed at any time by clicking on the Edit Query Details button.
The next step is to configure the Match Details. To do this, click Edit Match Details. Constraints Definition screen appears as shown below.
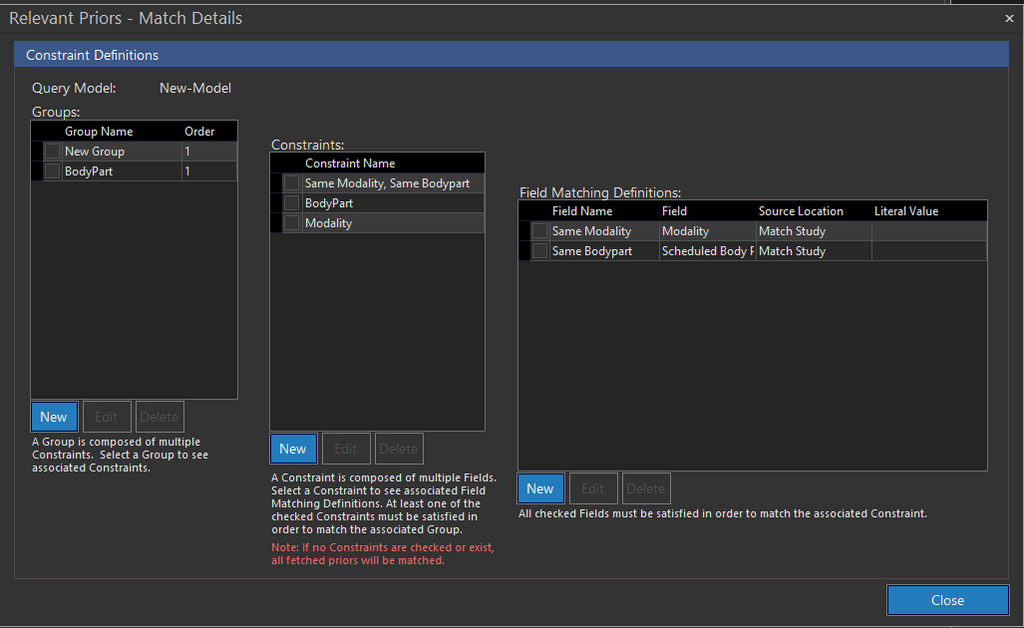
There are three levels to understand here. A Group is composed of multiple Constraints. Each Constraint can be composed of multiple Field Matching Definitions.
Configuring Groups
The Groups list box displays all the groups that will be used for identifying prior studies as relevant priors.
To create a new Group, click New found below Groups list box. The Edit Group screen appears as shown below.

Enter a Group Name and Group Order and click OK to make it part of the Query Model.
If there is already an existing Group that you will like to associate with the current Query Model, simply click on the check box located immediately to the left of the Group Name. Make sure that a check mark appears.
Create and associate as many Groups as needed for the selected Query Model.
Configuring Constraints
Next, define and associate Constraints with a particular Group. In order to do this, select a Group in the Groups list box. All of the Constraints associated with the selected Group will be checked.
To create a new Constraint, click New found below the Constraints list box. The Edit Constraint screen appears as shown below.

Enter a name for the new Constraint and click OK to make it a part of the Group.
If there is already an existing Constraint that you will like to associate with the current Group, simply click on the check box located immediately to the left of the Constraint Name. Make sure that a check mark appears.
Create and associate as many Constraints as needed for the selected Group.
Configuring Field Matching Definitions
Lastly, define and associate Field Matching Definitions. In order to do this, select a Constraint in the Constraints list box. All of the Field Matching Definitions associated with the selected Constraint will contain a check mark beside it.
To create a new Field, click New found below the Field Matching Definitions list box. The Edit Field Matching Definition screen appears as shown below.

Enter a name for this new definition into the Field Name field. From the Field drop-down menu, select the field that the matching will be performed against. Under Source Location choose either the Match Study or Match Literal option. Match Study indicates that this field will be compared against the same field on the reference study. Match Literal means that this field will be compared against the Literal Value that is specified in the last field. If the Match Study option is chosen, a value in the Literal Value field is not required.
If there is already an existing Field Matching Definition that you will like to associate with the current Constraint, simply click on the check box located immediately to the left of the Constraint Name. Make sure that a check mark appears.
Create and associate as many Field Matching Definitions as needed for the selected Constraint.
Note: If no constraints exist or if no constraints are chosen by the user, all fetched priors will be matched by the system.
The relevant prior mechanism has now been set up. To activate the relevant prior matching it needs to be associated with a routing rule. More information on this can be found in the Configuring Routing topic.