Managing Window Level Presets
Although the PowerReader software allows you to change the window and level value in the Window Level tool on the fly, quite often it is not necessary. Applying preset window level values to the image will display the images in the optimal state. The RamSoft software provides the capability of creating preset values for Window Level. Once created, any preset can be applied to an image with the click of a mouse or a keyboard shortcut. These presets can be created for specific modalities and body parts, as well as made available only to certain users. 12 window presets are defined by default. These default presets can be modified or deleted. New window presets that are not based on the defaults can also be created. This functionality is found in the Setup Window Presets dialog.
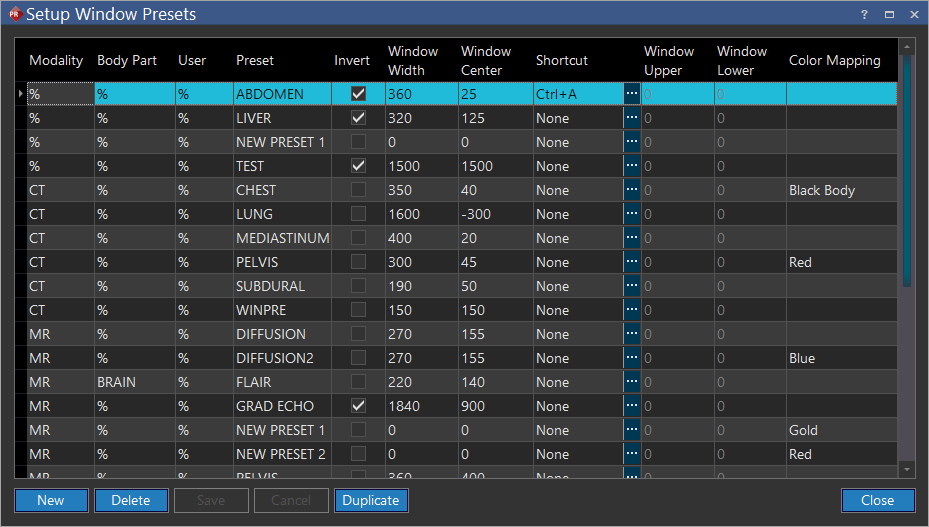
Click View > Window Presets to launch Setup Window Presets. Set Window Presets screen appears as shown below.
| FIELD | DESCRIPTION |
|---|---|
| Modality | The Modality field determines what modality the preset applies to. When a study is opened, only the presets that apply to its modality type and body part will be available for use. Placing the % value into any of the fields, indicates that all values will be accepted for that field |
| Body Part | The Body Part field specifies what body part(s) the preset applies to. When a study is opened, only the presets that apply to its modality type and body part will be available for use. Placing the % value into any of the fields, indicates that all values will be accepted for that field |
| User | The specific user for whom this windows preset will be displayed. Placing the % into this field will display it for all users. A system Wide admin can assign a preset to any user. A local admin can assign this to users of his/ her facility. Any other user with the Modify Window Options privilege will be able to create and assign new presets to themselves |
| Preset | The Preset field is used to define the name of the preset. This is what the user will see when selecting a window preset to use, so it should be something intuitive |
| Invert | The Invert checkbox specifies whether the original image should be inverted |
| Window Width | The Window Width is the value used by the Window Level tool to define the window width (window) value |
| Window Center | The Window Center field defines the value used by the Window Level tool for window center (Level) value |
| Shortcut | The Shortcut allows users to assign custom shortcuts to windows presets. Each user will be ale to view their own shortcut keys. Please refer to the section Programmable Shortcut Keys for more information. |
| Window Upper | Used for color mapping of PET and Nuclear Medicine (NM) studies. When these two modalities are chosen for any particular preset, the Window Width and Window Center fields are disabled while the Window Upper field is enabled. Window Upper field performs the same function for these modalities as the Window Width and Window Center columns. It is recommended that you enter some values for this field. Should you leave the Window Upper field blank, the Windows Upper and Windows Lower values will not change when this preset is applied to the image |
| Window Lower | Used for color mapping of PET and Nuclear Medicine (NM) studies. When these two modalities are chosen for any particular preset, the Window Width and Window Center fields are disabled while the Window Lower field is enabled. Window Lower field performs the same function for these modalities as the Window Width and Window Center columns. It is recommended that you enter some values for this field. Should you leave the Window Lower field blank, the Windows Upper and Windows Lower values will not change when this preset is applied to the image |
| Color Mapping | Once a color has been chosen, it becomes the default color for that modality. The users also have the option to change the color for their images later by right clicking on the study and choosing Color Mapping option to select a color from the right click menu. For further information, refer to the How do I Apply Color to my Nuclear Images section |
Note: If the user leaves the Color Mapping option as blank, the existing color mapping on the image will not be changed when the window preset is applied. If the user leaves the Color Mapping option as None, the color mapping will be reset to no color mapping.
Assigning shortcuts to windows presets
Assigning shortcut keys to a color mapping is a simple process. Upon creation of a new preset, click ellipsis ![]() button will launch the Window Level Shortcut screen.
button will launch the Window Level Shortcut screen.

You can enter a shortcut key for the preset and click OK. If you try to assign a shortcut key which has been assigned to another action, an error message will be displayed.