Viewing Images
When a study is opened, it is loaded into the area called the Study Desktop.
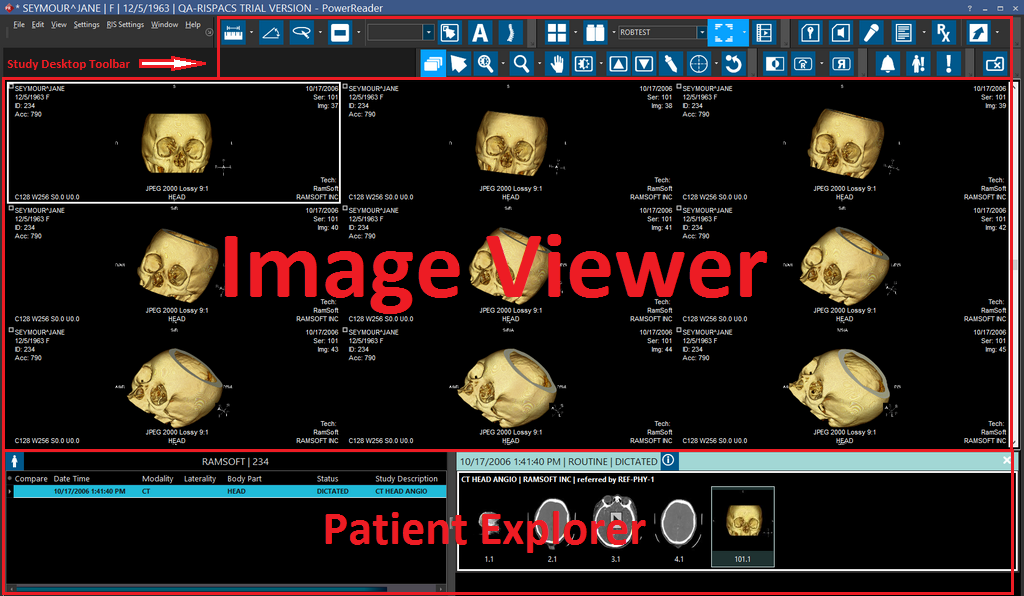
The Study Desktop is composed of three main areas. The Study Desktop Toolbars contain a variety of tools that can be used to manipulate the images visible on the screen as well as the contents of the screen itself. The Image Display Area is where all of the images of the patient are displayed. The Patient Explorer consists of two halves. The first half of the explorer is composed of a listing of all the series within the current study, as well as studies belonging to the patient. The second half contains the image thumbnails for all the images in the currently selected series. Images on display in the Image Display Area are highlighted among the image thumbnails of the patient explorer. A series with no images cannot be highlighted in the patient explorer. The basics of maneuvering around the Study Desktop are described in the Navigating the Study Desktop section of the manual.
Image Tools
Once you have grasped the concepts of the Study Desktop environment, you are ready to work with the study images. The section on Image Tools provides comprehensive information on the tools used for image manipulation:
- Selecting Images: selecting images for analysis
- Maximizing Images: maximizing images to fill the screen
- Image Scrolling: different methods for scrolling through images in a series
- Locking Images: to prevent images from moving off the screen
- Zoom: important for soft copy analysis
- Window Level: the most commonly used adjustment tool
- Sharpness: useful for outlining image details, highlighting issues
- Probe (Density): useful for analysis of bone density, etc
- Cross-hair pointer: interactive tool designed to visualize suspected pathology in every series
- Scout lines: lines that reference other orthogonal images in the study
- Transform Tools: tools for rotating and flipping the image
- Image Filters: when images are not quite diagnostic quality, sometimes an image filter can enhance them enough to be useful
- Applying Color to Nuclear Images: when viewing nuclear and PET images, applies a predefined color gradient to grayscale values to help with diagnosis
- Undo: how to undo or reset image to original state
Annotation Tools
When interesting or important details are found in an image, it is a good idea to mark that information for future viewing. Furthermore, it can be very helpful in outlining a diagnosis described in the reading physician's report. Annotation Tools mark information on an image, and also be used to gather quantitative information about areas of the images that cannot be computed by the human eye:
- Measure Distance
- Measure Cobb Angle
- Region Of Interest
- Shutter
- Point of Interest and Text Annotation
- Plumb Lines
- Spine Labelling
- Toggle Overlays
Layout and Viewing Protocol
A Viewing Protocol refers to how study images are laid out on the screen, as well as properties of the interaction between the user and the images. The Viewing Protocol is one of the most important concept of image layout in PowerReader. The Layout and Viewing Protocol section also explain:
- Viewports: describes the procedures to set up or change layouts with multiple Viewports and layouts within a Viewport.
- Image Series, including Linking Images Across Series and Fusing Series.
- How to Compare Studies. Viewing a prior case next to the current one is useful in monitoring changes occurred since the prior study was performed. Up to four studies can be simultaneously compared on one monitor.
Mammography
Although most thumbnails are the same, some mammography study thumbnails are different. See: Mammography Thumbnails. Mammography studies also contain CAD Tools. Also see: the Auto Size Feature for MG Images.